Servings: 6–8 | Prep time: 15 minutes | Bake time: 2½ hours | Total time: About 3 hours
Some recipes are born from necessity. The Great Depression forced home cooks to stretch every dollar, use every ingredient, and waste absolutely nothing. What emerged from those hard times wasn’t just survival food — it was genius. Simple, humble ingredients transformed into something far greater than the sum of their parts.
This 5-Ingredient Depression-Era Caramelized Oven Bake is exactly that kind of recipe.
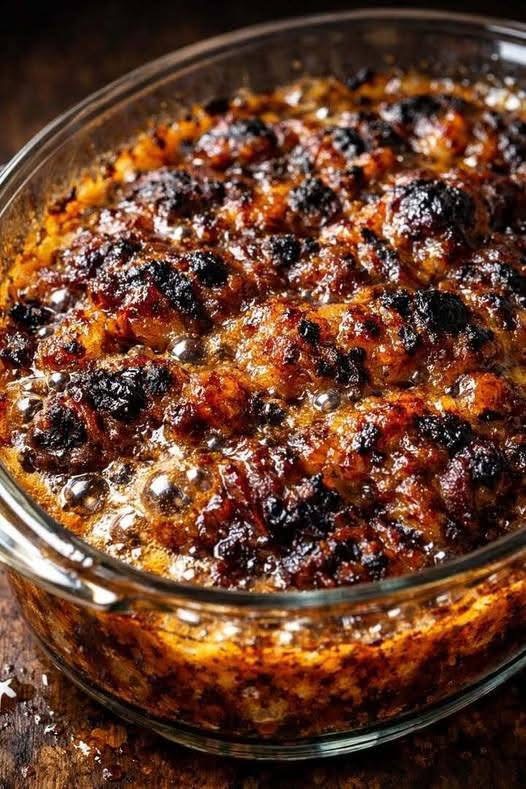
Potatoes. Onions. Butter. Oil. Salt. That’s it. Five ingredients. No cheese. No cream. No meat. No fancy spices. And yet, after a long, slow bake in a low oven, these meager provisions become something magical: soft, sweet, buttery, deeply caramelized layers of potato and onion that taste like they cost a fortune.
The secret is time and patience. The slow heat coaxes natural sugars out of the onions and potatoes. The salt draws out moisture, creating a natural broth that keeps everything tender. And that final uncovered bake turns the top into a golden, crispy, caramelized crown that will have everyone fighting over the crispy edges.
This isn’t just a side dish. It’s a history lesson. It’s a testament to resourcefulness. And honestly? It’s one of the most delicious things you’ll ever make with almost nothing.
Why You’ll Love This Recipe
-
Only five ingredients – Potatoes, onions, butter, oil, and salt. That’s it.
-
Pennies per serving – This might be the most budget-friendly recipe you own.
-
Deep, complex flavor – Slow caramelization creates sweetness and depth you won’t believe.
-
No cheese, no cream, no meat – Dairy-free (if you use oil instead of butter) and naturally vegan-friendly.
-
Hands-off cooking – Pop it in the oven and walk away for hours.
-
Comfort food at its purest – Warm, tender, and deeply satisfying.
-
Perfect for any meal – Breakfast, lunch, dinner, or holiday table.
Ingredients
-
Potatoes (Russet or Yukon Gold) – 3 pounds
-
Yellow onions – 2 large, thinly sliced
-
Salted butter – 4 tablespoons, cut into small pieces
-
Vegetable oil (or other neutral oil) – 2 tablespoons
-
Kosher salt – 1½ teaspoons
Ingredient Notes
Why Russet or Yukon Gold?
-
Russet potatoes – Starchy and fluffy. They break down slightly, creating a softer, more tender casserole. They absorb the onion juices beautifully.
-
Yukon Gold potatoes – Buttery, waxy, and firm. They hold their shape better and have a naturally creamy texture. Either works wonderfully — it’s a matter of preference.
Why yellow onions?
Yellow onions have the highest natural sugar content of any onion. When slowly caramelized, they become sweet, jammy, and almost earthy. White onions are sharper and won’t sweeten as much. Red onions work but will tint the dish purple.
Why salted butter?
The recipe already includes kosher salt, so unsalted butter works fine. But salted butter adds an extra layer of savory richness. If using unsalted butter, increase the kosher salt to 2 teaspoons.
Why both butter and oil?
Butter provides flavor. Oil provides a higher smoke point, preventing the butter from burning during the long bake. Together, they’re perfect.
Why kosher salt?
Kosher salt dissolves more evenly and is less likely to create salty pockets. Table salt works but use only 1 teaspoon (it’s more concentrated).
Step-by-Step Directions
Step 1: Prepare the Vegetables
Preheat your oven to 325°F (163°C) . Lightly grease an oval glass casserole dish (or a 9×13-inch baking dish) with a bit of vegetable oil.
Peel and slice the potatoes: Peel the 3 pounds of potatoes (or scrub them well if you prefer to keep the skins on for a more rustic dish). Slice them into thin rounds, about ⅛ to ¼ inch thick. A mandoline makes this step fast and consistent, but a sharp knife and a steady hand work just fine.
Slice the onions: Cut the 2 large yellow onions in half from root to stem, then slice them into thin half-moons. Aim for slices about ¼ inch thick.
Pro tip: Uniform thickness matters here. Potatoes that are all the same thickness cook evenly. If some are paper-thin and others are thick, you’ll end up with mushy spots next to undercooked ones.
Step 2: Season and Toss
In a very large bowl, combine the sliced potatoes and onions. Add the 2 tablespoons of vegetable oil and 1½ teaspoons of kosher salt. Toss well with your hands or two large spoons until every slice is evenly coated.
Why this step matters: The salt draws out moisture from the onions (and potatoes), forming a natural liquid as the dish bakes. This creates a savory broth that keeps everything tender and helps the flavors meld together. Do not skip the salt.
Step 3: Layer Loosely in the Dish
Transfer the potato-onion mixture into the prepared casserole dish. Do not pack it down. Leave it loose and fluffy so air can circulate between the layers.
Scatter the 4 tablespoons of butter pieces throughout the dish, tucking some between the layers and leaving a few on top. The butter will melt and trickle down as it bakes.
Step 4: Slow Bake Covered
Cover the dish tightly with aluminum foil. Make sure the edges are sealed so steam doesn’t escape.
Bake at 325°F for 1½ hours.
During this stage, the vegetables soften, release their juices, and begin to meld together in their own natural liquid and melted butter. The dish will look pale and wet when you peek — that’s exactly what you want.
Step 5: Caramelize Uncovered
Remove the foil carefully (watch for hot steam). Raise the oven temperature to 375°F (190°C) .
Return the uncovered dish to the oven and bake for another 45 to 60 minutes.
What you’re looking for:
-
Deep golden-brown color on top
-
Bubbling, caramelized edges where the natural sugars have concentrated
-
A rich, sweet, almost roasted aroma filling your kitchen
Some edges may look almost dark brown or blackened — that’s not burning, that’s caramelization. Those crispy, dark bits are the best part.
Step 6: Rest Before Serving
Remove the dish from the oven and let it rest for 15 to 20 minutes before serving.
Why rest? This resting time allows the juices to settle and thicken slightly, so the casserole holds together better when scooped. If you serve it immediately, it will be loose and soupy. Patience pays off here.
Variations & Tips
Add Fresh Herbs
Sprinkle 1 tablespoon of fresh thyme leaves or 1 tablespoon of fresh rosemary (finely chopped) over the vegetables before baking. The earthy, aromatic herbs pair beautifully with the sweet caramelized onions.
Add Garlic
Tuck 6–8 whole peeled garlic clovesinto the layers before baking. They’ll roast into sweet, spreadable, jammy nuggets of flavor.
Add a Splash of Acid
After baking, drizzle 1 tablespoon of balsamic vinegar or apple cider vinegar over the finished dish. The acidity cuts through the richness and brightens everything up.
Make It Cheesy (Not Depression-Era, But Delicious)
Sprinkle 1 cup of grated Parmesan, Gruyère, or sharp cheddar over the top during the last 15 minutes of uncovered baking. The cheese will melt into a golden, crispy crust.
Add Bacon (Also Not Depression-Era)
Scatter ½ cup of cooked, crumbled bacon over the top before the final bake. Because bacon.
Make It a Full Meal
-
Top with fried or poached eggs for a hearty breakfast or brunch.
-
Serve alongside roast chicken, pork chops, or steak.
-
Add cooked sausage or kielbasapieces to the layers.
Make It Vegan
Replace the salted butter with 4 tablespoons of vegan butter or additional olive oil. The dish will still be rich and caramelized, just without dairy.
Make It in a Cast Iron Skillet
A cast iron skillet works beautifully for this recipe. The heavy metal retains heat and promotes even browning. Follow the same temperatures and timing.
Make It in a Slow Cooker
This recipe was designed for the oven’s dry heat, which creates caramelization. A slow cooker traps moisture and won’t brown the top. However, you can:
-
Cook on LOW for 6–8 hours until tender.
-
Transfer to a baking dish and broil for 5–10 minutes to caramelize the top.
Storage & Reheating
Refrigerator: Store leftovers in an airtight container for up to 5 days. The flavors deepen and improve overnight.
Reheating:
-
Oven (best method): 350°F for 10–15 minutes, uncovered, to re-crisp the top.
-
Skillet: Warm over medium heat, stirring occasionally, until hot.
-
Microwave: 1–2 minutes per serving. The texture won’t be as crisp, but it’s fast.
Freezing: This casserole freezes well for up to 3 months. Transfer cooled leftovers to a freezer-safe container. Thaw overnight in the refrigerator before reheating in the oven. The texture may be slightly softer but still delicious.
Frequently Asked Questions (FAQs)
Why is this called a “Depression-Era” recipe?
During the Great Depression (1929–1939), families had very little money and limited access to fresh ingredients. Potatoes and onions were cheap, shelf-stable, and widely available. Butter and oil were used sparingly. This recipe represents the ingenuity of Depression-era cooks who made delicious, filling meals from almost nothing.
Do I have to peel the potatoes?
No. Leaving the skins on adds fiber, nutrients, and a rustic texture. Scrub the potatoes very well before slicing. The skins will soften during the long bake but will still have a bit of chew.
My potatoes are still hard after 2½ hours. What went wrong?
A few possibilities:
-
Your oven runs cool. Check the temperature with an oven thermometer.
-
Your slices were too thick. Aim for ⅛ to ¼ inch.
-
You packed the dish too tightly, preventing heat from circulating.
-
You used waxy potatoes (like red potatoes) instead of Russets or Yukon Golds.
The top is burning but the potatoes aren’t done.
Cover the dish loosely with foil for the remaining bake time, then remove the foil for just the last 10–15 minutes to brown the top.
Can I add other vegetables?
Absolutely. Try adding:
-
Thinly sliced carrots (adds sweetness)
-
Thinly sliced parsnips (nutty and sweet)
-
Sliced fennel (anise-like flavor that pairs beautifully with onions)
-
Thinly sliced bell peppers (adds color and sweetness)
Can I make this ahead of time?
Yes. Prepare the dish completely, let it cool, and refrigerate. To serve, reheat covered at 325°F for 20–25 minutes, then uncover and bake at 375°F for 10–15 minutes to re-crisp the top.
Why is my dish watery?
This is normal during baking. The salt draws out moisture from the onions and potatoes. Resting the dish for 15–20 minutes after baking allows the liquid to be reabsorbed and the juices to thicken. If it’s still too watery after resting, spoon off some of the liquid or return the dish to the oven uncovered for another 10–15 minutes.
What to Serve With It
This dish is incredibly versatile. Here’s how to fit it into any meal:
As a side dish:
-
Roast chicken or turkey
-
Pork chops or pork tenderloin
-
Steak or pot roast
-
Meatloaf (another Depression-era classic)
-
Baked ham
As a breakfast or brunch:
-
Topped with fried eggs (the runny yolk mixes with the caramelized onions — incredible)
-
Alongside bacon or sausage links
-
Served with a simple fruit salad
As a vegetarian main:
-
With a side of roasted Brussels sprouts
-
Topped with a poached egg and a sprinkle of fresh parsley
-
Alongside a crisp green salad with lemon vinaigrette
As a holiday side:
-
Thanksgiving (replaces or complements mashed potatoes)
-
Christmas dinner
-
Easter brunch
The History Behind the Dish
During the Great Depression, families couldn’t afford meat, cheese, or butter in large quantities. Potatoes and onions were staples because they cost almost nothing and could be stored for months without refrigeration.
Recipes like this one emerged from cookbooks, community kitchens, and handwritten family recipe cards. The technique of slow-baking with salt to draw out natural moisture was a clever way to create a “gravy” without any additional liquid or fat.
This dish is sometimes called “Depression Potatoes” or “Poverty Casserole.” But don’t let the name fool you — it’s not about deprivation. It’s about resourcefulness. It’s about making something beautiful from almost nothing. And it’s a reminder that delicious food doesn’t require expensive ingredients — just time, patience, and a little bit of know-how.
Final Thoughts
This 5-Ingredient Depression-Era Caramelized Oven Bake is more than a recipe. It’s a connection to the past. It’s proof that simple food, treated with care and patience, can become extraordinary.
The next time you’re staring at a pantry that feels bare, remember this dish. Potatoes. Onions. Butter. Oil. Salt. That’s all you need to create something warm, sweet, savory, and deeply satisfying. No cheese. No cream. No meat. Just time and heat and a little bit of faith.
Make it once, and you’ll make it again and again — not because you have to, but because you want to. Because it’s delicious. Because it’s cheap. Because it’s honest food that feeds both body and soul.