Canned tuna is a pantry hero. It is cheap. It is shelf-stable. It is packed with protein. But let us be honest. Most people only use it for two things: tuna salad sandwiches and tuna casserole. Both are fine. Both are also a little boring.
This 5-ingredient oven baked canned tuna changes everything.
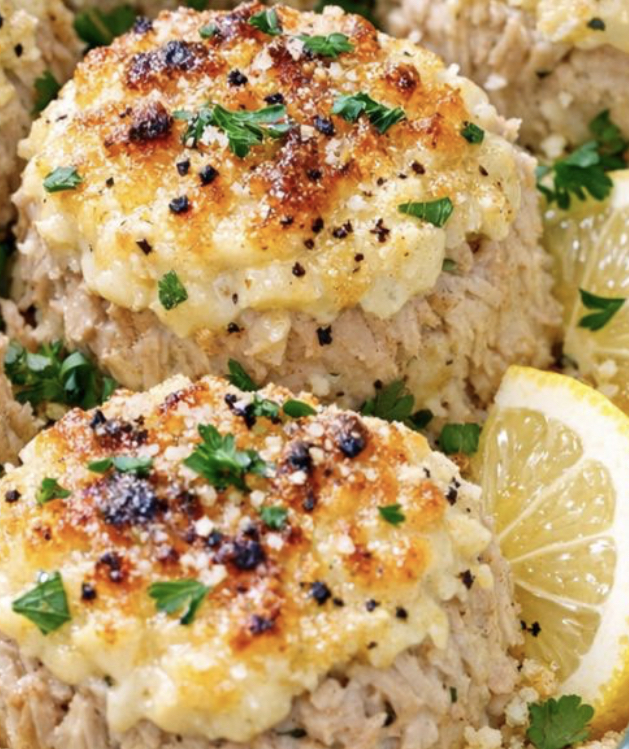
You keep the tuna in its whole cylindrical shape. You top it with a creamy, tangy, seasoned mayonnaise and mustard sauce. You bake it until the edges are golden and the juices are bubbling. What emerges from the oven looks almost like a piece of baked fish. It tastes nothing like the sad, dry tuna you remember from childhood.
This is tuna transformed. And it takes exactly five ingredients and about five minutes of active work.
Let me show you how to make it.
Why This Recipe Is a Game Changer
Before we dive into the method, here is why this baked tuna deserves your attention.
-
Only 5 ingredients. Pantry staples you already have.
-
No draining required. The tuna goes into the dish with its own liquid.
-
No pre-cooking. Open the cans and bake.
-
Protein-packed. Two cans deliver over 40 grams of protein.
-
Budget-friendly. Canned tuna costs a fraction of fresh fish.
-
Versatile. Serve whole or shredded, hot or cold.
-
Perfect for one or two people. Easy to scale up or down.
Ingredients
Servings: 2 to 3
-
2 (5-ounce) cans tuna in water or oil, undrained
-
2 tablespoons mayonnaise
-
1 tablespoon yellow mustard
-
1 teaspoon garlic powder
-
1 teaspoon dried Italian seasoning (or dried parsley or oregano)
Ingredient Notes
Canned tuna: Use tuna packed in water or oil. Do not drain the cans. The liquid is essential for keeping the tuna moist during baking and for creating the seasoned juices you spoon over the finished dish. Water-packed tuna yields a lighter, cleaner flavor. Oil-packed tuna yields a richer, more luxurious result. Both work. Do not use tuna packed in brine, which can be too salty.
Mayonnaise: Full-fat mayonnaise creates the creamiest, richest topping. Reduced-fat mayonnaise works but the sauce will be thinner and less flavorful. Do not use Miracle Whip or other salad dressings. The sweetness will clash with the mustard and Italian seasoning.
Yellow mustard: Classic yellow mustard provides tang and brightness. Dijon mustard can be substituted for a more sophisticated, less sharp flavor. Do not use honey mustard or spicy brown mustard unless you want a significantly different flavor profile.
Garlic powder: Garlic powder distributes evenly through the sauce without the harsh bite of fresh garlic. Do not substitute garlic salt, which would add unnecessary sodium. If you only have garlic salt, reduce or omit additional salt elsewhere.
Dried Italian seasoning: This blend typically contains oregano, basil, rosemary, thyme, and marjoram. It adds a savory, herbaceous note that complements the tuna beautifully. Dried parsley or dried oregano alone also work. Dried dill is another excellent option.
Step-by-Step Instructions
Step 1: Preheat the Oven
Preheat your oven to 375°F (190°C). Place a small oven rack in the center of the oven. This ensures the tuna bakes evenly without the top browning too quickly or the bottom burning.
Step 2: Prepare the Baking Dish
Set a clear, oven-safe glass baking dish on the counter. An 8×8-inch square dish or a similar size works well. A small round pie plate or a 1-quart baking dish also works. The dish should be just large enough to hold the two tuna cylinders side by side with a little space around them.
Step 3: Unmold the Tuna
Open both cans of tuna, but do not drain them. Carefully slide or tap the tuna out of each can directly into the glass baking dish. Keep the tuna in its whole cylindrical shape as much as possible. The extra liquid from the cans should pour into the dish as well. Do not leave any liquid behind.
This is the most unusual step in the recipe, and it matters. Keeping the tuna in its cylindrical shape allows it to bake evenly and creates an appealing presentation. Breaking it up before baking would result in dry, crumbly tuna.
Step 4: Arrange the Tuna Cylinders
Use a spoon to gently nudge the tuna cylinders so they sit side by side in the middle of the dish. Leave a little space around them for the juices to bubble and reduce during baking. The cylinders can touch each other, but they should not touch the sides of the dish.
Step 5: Make the Sauce
In a small bowl, stir together the mayonnaise, yellow mustard, garlic powder, and dried Italian seasoning until smooth and creamy. The mixture should be thick, tangy, and fragrant. Taste it. Adjust with more mustard for tang or more seasoning for herb flavor.
Step 6: Top the Tuna
Spoon the seasoned mayo mixture evenly over the tops and sides of the tuna cylinders. Spread gently with the back of the spoon so you do not break the cylinders apart. It is fine if some of the mixture drips into the juices in the bottom of the dish. That just adds flavor to the finished sauce.
Step 7: Bake
Place the glass baking dish in the preheated oven. Bake for 18 to 22 minutes. The tuna is ready when it is heated through, the edges of the tuna cylinders are lightly golden, and the sauce is bubbling around the sides of the dish. The mayonnaise mixture will darken slightly and may develop a few golden brown spots.
Step 8: Rest
Carefully remove the dish from the oven. Use oven mitts. The dish and the juices will be very hot. Let the tuna rest for 3 to 5 minutes. This brief rest allows the hot juices to settle so they are easier and safer to spoon over the tuna when serving.
Step 9: Serve
Serve the whole tuna cylinders as they are for a rustic, hearty look. Spoon some of the seasoned juices from the bottom of the dish over the top of each cylinder. If your family prefers, you can gently break the tuna apart at the table with a fork and mix it with the juices for a more shredded, saucy consistency.
How to Serve Baked Canned Tuna
This baked tuna is surprisingly versatile. Here are five ways to turn it into a complete meal.
Over Rice: Spoon the tuna and its seasoned juices over a bed of white rice, brown rice, or jasmine rice. The rice absorbs the tangy, savory sauce beautifully.
Over Salad: Flake the warm tuna over a bed of mixed greens, cherry tomatoes, cucumber, and red onion. The warm tuna acts as the protein and the sauce becomes the dressing.
On Toast: Mash the tuna onto thick slices of toasted sourdough or whole grain bread. Top with a sprinkle of fresh parsley or a squeeze of lemon.
With Roasted Vegetables: Serve alongside roasted asparagus, broccoli, or zucchini. The simple, clean flavors of roasted vegetables balance the rich, tangy tuna.
In a Wrap: Flake the tuna into a warm flour tortilla. Add shredded lettuce, diced tomato, and a drizzle of extra mayonnaise or hot sauce. Roll and eat.
Variations & Tips
Make It Spicy
Add 1/2 teaspoon of cayenne pepper, 1 teaspoon of sriracha, or 1/2 teaspoon of red pepper flakes to the mayonnaise mixture. The heat cuts through the richness beautifully.
Make It Cheesy
Sprinkle 1/4 cup of grated Parmesan cheese or shredded cheddar cheese over the tuna during the last 5 minutes of baking. Return to the oven to melt the cheese.
Make It Lemon-Herb
Add 1 teaspoon of lemon zest and 1 tablespoon of fresh lemon juice to the mayonnaise mixture. Substitute fresh dill or fresh parsley for the dried Italian seasoning.
Make It Mediterranean
Add 2 tablespoons of finely chopped sun-dried tomatoes and 2 tablespoons of crumbled feta cheese to the top of the tuna before baking. Omit the yellow mustard and use Dijon instead.
Make It With Greek Yogurt
Substitute half of the mayonnaise with plain Greek yogurt. The sauce will be tangier, lighter, and lower in fat. Do not substitute all of the mayonnaise, or the sauce may become too thin.
Make It With Different Seasonings
Try smoked paprika and onion powder. Try curry powder for an Indian-inspired version. Try chili powder and cumin for a Southwestern version.
Make a Double Batch
Use four cans of tuna and a 9×9-inch or 7×11-inch baking dish. Increase the baking time by 5 to 10 minutes. The sauce ingredients double easily.
Pro Tips for Absolute Success
Do not drain the tuna. The liquid in the can is not waste. It is flavor and moisture. Pouring it into the dish keeps the tuna from drying out during baking and creates the seasoned juices you spoon over the finished dish.
Do not break up the tuna before baking. The cylindrical shape is not just for presentation. It allows the tuna to cook evenly and retain moisture. Breaking it up would expose more surface area to the heat, leading to dry, crumbly tuna.
Use a glass baking dish. Glass conducts heat evenly and allows you to see the juices bubbling around the edges. Metal pans can react with the acidity of the mustard and mayonnaise.
Let the tuna rest before serving. The 3 to 5 minute rest is not optional. It allows the juices to settle and the temperature to drop slightly so you do not burn your mouth.
Serve immediately. This dish is best hot from the oven. The tuna can dry out if left sitting in the warm dish for too long.
Frequently Asked Questions
Can I use chunk light tuna instead of solid white tuna?
Yes. Solid white tuna (albacore) holds its cylindrical shape better. Chunk light tuna is more broken up straight from the can and may not stay in a neat cylinder. It still tastes delicious but will look less impressive.
Can I use tuna packed in oil instead of water?
Yes. Oil-packed tuna is richer and more flavorful. The resulting dish will be slightly higher in fat but also more luxurious. Do not drain the oil. Pour the entire can into the baking dish.
Can I make this recipe with salmon or chicken?
Yes. Canned salmon works beautifully. Use the same method. Canned chicken also works. For canned chicken, you may need to shape it into patties or cylinders yourself, as it does not hold the cylindrical shape from the can.
Can I add vegetables to the baking dish?
Yes. Add 1/2 cup of diced bell peppers, 1/2 cup of sliced mushrooms, or 1/2 cup of cherry tomatoes around the tuna cylinders before baking. The vegetables will roast in the juices and add flavor and nutrition.
Is this recipe keto-friendly or low-carb?
Yes. This recipe is naturally low in carbohydrates. The mayonnaise, mustard, and seasonings contain minimal carbs. Serve the tuna over zucchini noodles or cauliflower rice instead of rice or bread.
Can I use fresh tuna steaks instead of canned?
No. This recipe is specifically designed for canned tuna. Fresh tuna steaks require different cooking times and temperatures. Use a fresh tuna recipe instead.
Why is my tuna dry?
You either overbaked it, drained the cans, or used tuna packed in water that was too lean. Bake for the minimum time first, 18 minutes, and check for doneness. Do not drain the cans. Consider using oil-packed tuna for a moister result.
Can I meal prep this recipe?
Yes. Bake the tuna as directed. Let it cool completely. Store in an airtight container in the refrigerator for up to 3 days. Serve cold over salad or reheat gently in the microwave or oven.
Can I freeze baked tuna?
Freezing is not recommended. The texture of the mayonnaise and the tuna will degrade upon thawing. The sauce will separate and the tuna will become dry and grainy.
Why This Recipe Works
Canned tuna has a reputation for being dry and bland. That reputation comes from how most people prepare it. They drain the liquid, mix the tuna with mayonnaise and relish, and eat it cold on bread. That method is fine. But it does not showcase what tuna can be.
This baked method is different. By leaving the tuna in its cylindrical shape and baking it with the canning liquid, you create a gentle steam environment. The tuna stays moist. The edges brown slightly, adding texture. The mayonnaise and mustard topping bakes into a tangy, creamy crust that seals in moisture.
The result is a dish that tastes far more expensive and complicated than it actually is. It is proof that canned ingredients, treated with a little creativity, can become something special.
Keep a few cans of tuna