
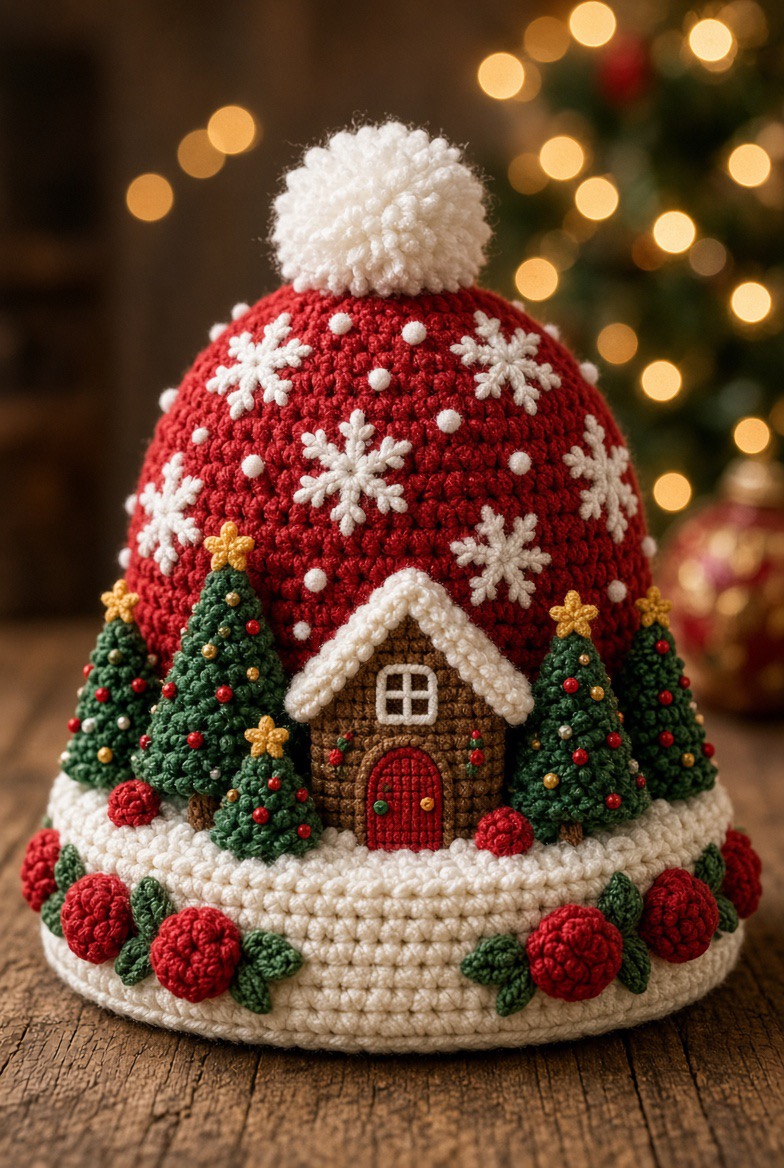
Crochet Pattern — Christmas Village Dome
Original adapted pattern based on the reference image, not the original creator’s exact pattern.
Materials
- Red chunky yarn
- Cream/white yarn
- Dark green yarn
- Brown yarn
- Mustard-yellow yarn
- Small amounts of black, red, gold, and other colors
- 4–5 mm crochet hook, depending on yarn
- Tapestry needle
- Scissors
- Stuffing
- Small beads or embroidery thread for decorations
- Optional cardboard/plastic insert for a firm base
Abbreviations
- MR = Magic Ring
- ch = Chain
- sc = Single Crochet
- hdc = Half Double Crochet
- dc = Double Crochet
- inc = 2 stitches in one stitch
- dec = Single Crochet 2 Together
- sl st = Slip Stitch
- FO = Fasten Off
4. Red Christmas Dome
Using red yarn:
Rnd 1: MR, 6 sc. (6)
Rnd 2: inc around. (12)
Rnd 3: sc, inc around. (18)
Rnd 4: 2 sc, inc around. (24)
Rnd 5: 3 sc, inc around. (30)
Rnd 6: 4 sc, inc around. (36)
Rnd 7: 5 sc, inc around. (42)
Rnd 8: 6 sc, inc around. (48)
Rnd 9: 7 sc, inc around. (54)
Rnd 10–18: sc around. (54)
Rnd 19: 7 sc, dec around. (48)
Rnd 20: 6 sc, dec around. (42)
Continue decreasing gradually until the dome reaches the desired size.
FO and lightly stuff or place over a rounded form.
5. White Snow Dots
Using white yarn, make small raised dots.
Rnd 1: MR, 6 sc. (6)
Rnd 2: inc around. (12)
FO.
Sew small dots randomly across the red dome.
6. Crochet Snowflakes
Make several small white snowflakes.
Rnd 1: MR, 6 sc. (6)
Rnd 2: ch 3, sl st in next stitch around.
Rnd 3: In each chain space, ch 2, 2 dc, ch 2, sl st.
FO and sew the snowflakes onto the red dome.
7. Christmas Trees
Make 3–5 trees in different sizes.
Large Tree
Row 1: ch 2, 2 sc into 2nd ch. (2)
Row 2: ch 1, turn, inc across. (4)
Row 3: ch 1, turn, sc across. (4)
Row 4: ch 1, turn, inc, sc 2, inc. (6)
Row 5: sc across. (6)
Row 6: ch 1, turn, inc, sc 4, inc. (8)
Row 7: sc across. (8)
Continue increasing every other row until the tree reaches the desired width.
Add a few rows of scalloped stitches along the edges for layered branches.
FO.
Make smaller trees using fewer rows.
8. Yellow Tree Stars
Make a small star for each tree.
Rnd 1: MR, 5 sc. (5)
Rnd 2: sl st, ch 2, 2 dc, ch 2, sl st into each stitch.
FO.
Sew one star onto the top of each tree.
Add tiny beads as ornaments.
9. Gingerbread House
Using brown yarn:
Row 1: ch 18.
Row 2–9: sc across. (17)
For the roof peak, decrease toward the center on both sides to create a triangular roof shape.
FO.
Cream Roof
Make two cream strips:
Row 1: ch 20.
Row 2: sc across.
Row 3: sc, ch 2, skip 1 stitch, sc across.
Sew the strips along the two roof slopes and add a scalloped edge.
Door
Using red yarn:
Rnd 1: MR, 6 sc. (6)
Rnd 2: inc around. (12)
Rnd 3: sc around. (12)
Shape the top into a rounded arch and sew onto the house.
Add a cream border around the door.
Window
Using white yarn:
Make a small square with sc stitches and sew it above the door. Add two crossing stitches to create the window panes.
10. Cream Snow Base
Using cream yarn:
Rnd 1: MR, 6 sc. (6)
Rnd 2: inc around. (12)
Rnd 3: sc, inc around. (18)
Rnd 4: 2 sc, inc around. (24)
Continue increasing until the circle is wide enough for the bottom of the dome.
Rnd 8–12: sc around.
For the thick snowy edge, work several rounds of raised front-post or textured stitches.
FO.
11. Pom-Pom
Using cream yarn, make a large fluffy pom-pom.
Wrap yarn repeatedly around your fingers or a pom-pom maker, tie the center securely, cut the loops, and trim into a round fluffy shape.
Sew firmly onto the top of the red dome.
12. Assembly
- Attach the red dome to the cream snowy base.
- Sew the gingerbread house onto the front.
- Arrange the large and small Christmas trees around the house.
- Add yellow stars to the tree tops.
- Decorate the trees with tiny beads or embroidered ornaments.
- Sew white snowflakes and snow dots across the red dome.
- Add the large cream pom-pom to the top.
- Add small green leaves and red crochet flowers around the lower base.
- Secure every decorative piece firmly from the inside/back.
13. Finishing
Weave in all loose ends and gently shape the dome, trees, house, and snowy base. If you want the decoration to stand firmly like the reference, place a lightweight rigid insert inside the bottom base.