
Crochet Cat Tissue Holder – A Cute Handmade Home Décor Project
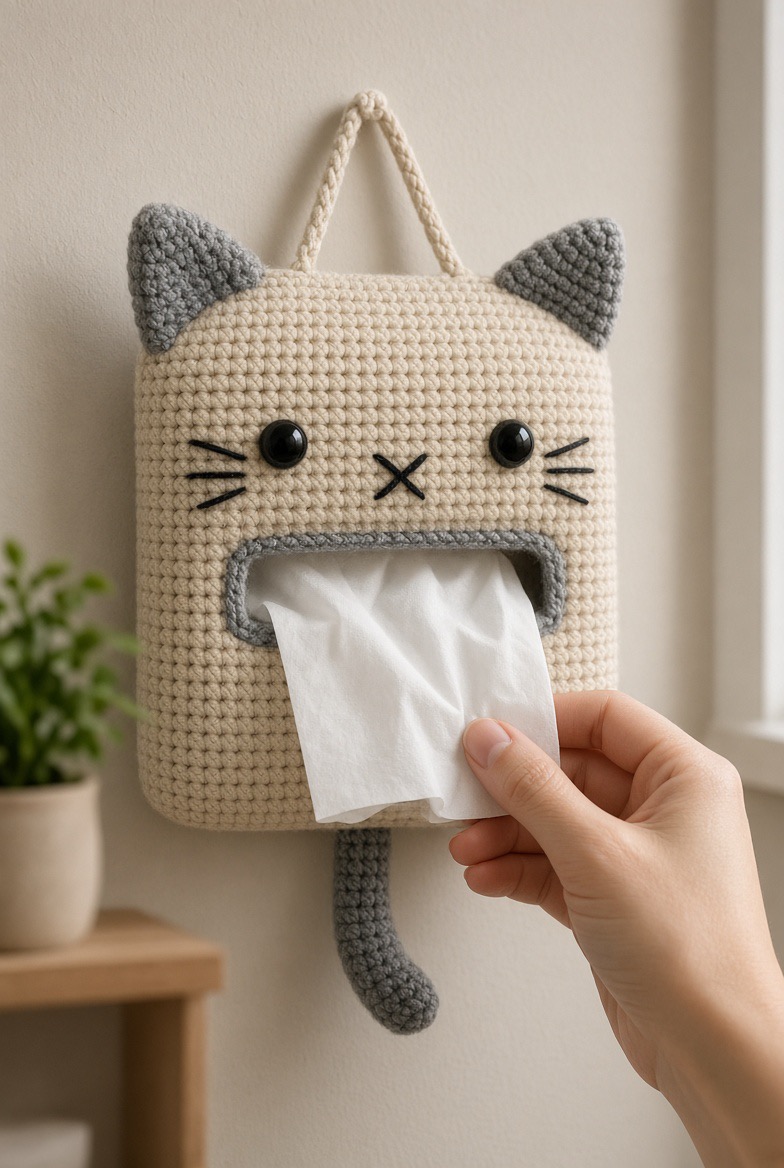
Add a little handmade charm to your home with this adorable Crochet Cat Tissue Holder. Designed to look like a sweet cat, this practical crochet project turns an everyday tissue box into a cute piece of décor. The neutral cream yarn, gray ears and trim, simple embroidered face, and little hanging tail give it a cozy handmade look that works beautifully in a bedroom, bathroom, nursery, or living room.
Why You’ll Love This Crochet Tissue Holder
This crochet cat tissue holder is both decorative and useful. The rectangular body is designed to fit a tissue box, while the opening in the front allows tissues to be pulled out easily. The cat face makes the project especially fun, and you can customize it with different yarn colors to match your home.
It is also a great handmade gift idea for anyone who loves cats, crochet, or cute home accessories.
Materials
- Medium-weight cotton or acrylic yarn in cream or beige
- Small amount of gray yarn for the ears and border
- Black yarn or embroidery thread for the eyes, nose, and whiskers
- Crochet hook suitable for your yarn
- Yarn needle
- Scissors
- Fiberfill for lightly shaping the ears and tail
- A tissue box for checking the size
- Optional: plastic safety eyes
Crochet Pattern
Abbreviations:
ch = chain
sc = single crochet
sl st = slip stitch
inc = increase
dec = decrease
st = stitch
BLO = back loop only
Main Body:
Chain enough stitches to match the width of your tissue box. Work single crochet rows until the piece is long enough to wrap around the box. Continue working evenly until the front and back panels are formed. Join the sides neatly with single crochet or slip stitches, leaving the top and bottom positioned so the tissue box can be inserted and removed easily.
Tissue Opening:
Mark the center of the front panel. Work around the opening with single crochet, creating a neat rectangular or slightly rounded opening large enough for tissues to pass through. Add one or two rounds of gray single crochet around the opening for a contrasting border.
Cat Ears:
Make two triangular ears in cream yarn. Work from the bottom upward, gradually decreasing toward the top point. Add a smaller gray or darker triangle to the front of each ear and sew the ears securely to the top corners.
Cat Face:
Attach safety eyes or embroider two black eyes. Stitch a small X-shaped nose and add three whiskers on each side using black yarn or embroidery thread.
Tail:
Crochet a narrow tube or chain-based strip in cream yarn and attach it to the bottom or back of the holder. Lightly stuff it if desired and curve it gently for a playful cat-tail effect.
Finishing:
Weave in all loose ends, check the fit using your tissue box, and gently shape the holder so the corners look neat. Insert the tissue box from the bottom or back, depending on your construction, and pull the first tissue through the opening.
Tips for Making It
For a sturdy tissue holder, cotton yarn works especially well because it holds its shape. Keep your stitches consistent so the sides remain straight. If your tissue box is larger or smaller than the sample, simply adjust the foundation chain and number of rows rather than following a fixed stitch count.
You can also personalize the design by changing the cat’s colors, adding a bow, using embroidered eyes, or creating different expressions.