
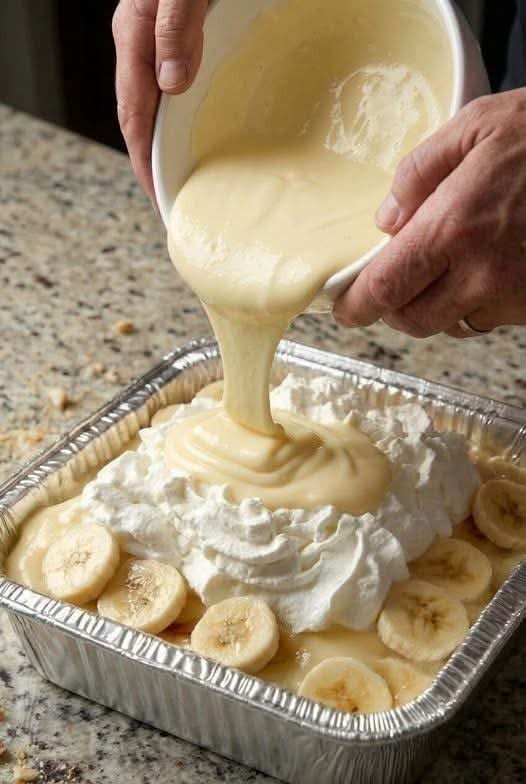
Not Yo’ Mama’s Banana Pudding – The Creamiest No-Bake Dessert
If you love classic banana pudding, get ready to fall head over heels for Not Yo’ Mama’s Banana Pudding! This irresistible no-bake dessert takes everything you love about traditional banana pudding and makes it even more indulgent with a rich cream cheese filling, sweetened condensed milk, fluffy whipped cream, and layers of ripe bananas and crunchy vanilla wafers.
Every spoonful delivers the perfect combination of creamy, sweet, and fruity flavors. As the dessert chills in the refrigerator, the vanilla wafers soften into delicious, cake-like layers while the bananas and silky pudding mixture come together beautifully. The result is a crowd-pleasing dessert that tastes as though you spent hours in the kitchen, even though the preparation takes just 20 minutes.
Whether you’re preparing a dessert for a family reunion, Sunday dinner, holiday gathering, church potluck, or summer barbecue, this easy banana pudding recipe is guaranteed to attract attention. Best of all, there’s no oven required, making it an excellent make-ahead dessert for busy days.
Why You’ll Love This Not Yo’ Mama’s Banana Pudding
– No-bake convenience: Prepare everything in about 20 minutes without turning on the oven.
– Extra-creamy texture: Cream cheese and sweetened condensed milk create a rich, smooth filling.
– Layers of deliciousness: Vanilla wafers, fresh bananas, and fluffy pudding make every bite irresistible.
– Perfect for making ahead: Refrigerating the pudding allows the flavors to blend and the wafers to soften.
– A crowd-pleasing dessert: It’s ideal for potlucks, family celebrations, picnics, and holiday meals.
– Simple ingredients: Everything comes together with familiar grocery-store staples.
Ingredients for Not Yo’ Mama’s Banana Pudding
Here’s everything you need to make this easy homemade banana pudding.
1. Vanilla Pudding Mix – 2 packages (3.4 ounces each)
The vanilla pudding mix provides the dessert’s classic vanilla flavor and creamy foundation. Using two packages creates enough pudding to build generous layers throughout the dish.
2. Cold Milk – 4 cups
Cold milk combines with the pudding mix to create a smooth, thick pudding base. Whole milk produces a particularly creamy result, although other varieties can work depending on the pudding mix instructions.
3. Sweetened Condensed Milk – 1 can (14 ounces)
This ingredient adds sweetness, richness, and a luxurious texture. It helps transform ordinary pudding into a decadent dessert filling with a deliciously milky flavor.
4. Whipped Cream – 1 container (8 ounces)
Whipped cream lightens the rich filling, creating a fluffy texture that balances the cream cheese and condensed milk. Use thawed frozen whipped topping or prepared whipped cream suitable for folding into the mixture.
5. Cream Cheese – 8 ounces
Cream cheese is the secret to the signature richness of Not Yo’ Mama’s Banana Pudding. It adds a gentle tang that balances the sweetness while giving the filling a smooth, cheesecake-like flavor. Let it soften to room temperature before mixing.
6. Vanilla Extract – 1 teaspoon
Vanilla extract enhances the flavor of the pudding and cream cheese mixture, giving the dessert a warm, classic aroma.
7. Ripe Bananas – 5 to 6 medium
Bananas provide natural sweetness, fruity flavor, and the familiar taste that makes banana pudding so beloved. Choose ripe yellow bananas with a few small brown spots, but avoid fruit that is overly soft or bruised.
8. Vanilla Wafers – 1 box (12 ounces)
Vanilla wafers add a delicate crunch and buttery vanilla flavor. After several hours in the refrigerator, they soften into tender layers that resemble a light cake between the creamy filling.
How to Make Not Yo’ Mama’s Banana Pudding
Follow these simple steps to prepare a beautifully layered no-bake banana pudding dessert.
Step 1: Prepare the Vanilla Pudding
In a large mixing bowl, combine the two packages of vanilla pudding mix with four cups of cold milk. Whisk until the mixture is smooth and no dry pudding mix remains.
Let the pudding stand for approximately five minutes, or until it begins to thicken. Set aside while you prepare the cream cheese filling.
Step 2: Beat the Cream Cheese
Place the softened cream cheese in a separate large bowl. Beat with an electric mixer until smooth and creamy, scraping down the sides of the bowl as needed.
Gradually add the sweetened condensed milk, mixing continuously until the mixture becomes silky and well combined. Add the vanilla extract and mix again.
Pro tip: Room-temperature cream cheese is much easier to blend and helps prevent lumps in your pudding.
Step 3: Fold in the Whipped Cream
Add the whipped cream to the cream cheese mixture. Gently fold it in with a spatula until the filling looks light, fluffy, and evenly combined.
Avoid vigorous stirring, which can deflate the whipped cream and make the filling less airy.
Step 4: Combine the Pudding and Cream Cheese Mixtures
Add the prepared vanilla pudding to the cream cheese mixture in a few portions. Fold gently after each addition until you have a smooth, uniform filling.
The finished mixture should be creamy, fluffy, and thick enough to spread over the banana and wafer layers.
Step 5: Slice the Bananas and Begin Layering
Peel the bananas and slice them into even rounds, approximately ¼ inch thick.
Arrange a layer of vanilla wafers across the bottom of a large serving dish. Add a layer of sliced bananas, distributing them evenly so that each serving will contain plenty of fruit.
Spread a generous layer of the pudding mixture over the bananas, covering them completely.
Step 6: Repeat the Layers
Continue layering the vanilla wafers, banana slices, and pudding mixture until all the ingredients have been used.
Finish with a smooth, generous layer of pudding on top. If desired, reserve a few vanilla wafers to crumble over the dessert just before serving.
Step 7: Chill Until Perfectly Set
Cover the dish tightly with plastic wrap and refrigerate for at least four hours. For the best flavor and texture, allow the pudding to chill overnight.
During this time, the wafers soften, the filling firms up, and all the flavors meld together into a deliciously creamy dessert.
Keep the pudding refrigerated until you’re ready to serve.
Expert Tips for the Best Banana Pudding
Use properly ripe bananas. Choose bananas that are sweet and fragrant but still firm enough to slice neatly. Overripe bananas can become mushy between the layers.
Soften the cream cheese first. Allow it to sit at room temperature before mixing. This small step makes a noticeable difference in the smoothness of the filling.
Use cold milk. Cold milk helps the instant pudding mix thicken properly. Follow the package directions if your particular pudding mix requires a different preparation method.
Fold instead of beating. Once the whipped cream is added, gentle folding preserves the light, airy texture of the filling.
Give it enough chilling time. Four hours is the minimum, but overnight chilling allows the wafers to soften and the flavors to develop more fully.
Cover the bananas with pudding. Make sure the banana slices are coated with the filling to help limit their exposure to air and slow browning.
Add crunchy toppings at the last minute. If you like a little contrast in texture, sprinkle crushed vanilla wafers over the top immediately before serving.
Delicious Variations to Try
One of the best things about this homemade banana pudding recipe is how easy it is to customize.
– Banana pudding cheesecake style: Add a little extra cream cheese for a tangier, richer filling.
– Caramel banana pudding: Drizzle caramel sauce between the layers or over individual servings.
– Chocolate banana pudding: Sprinkle mini chocolate chips between the layers for a chocolate-and-banana combination.
– Extra vanilla flavor: Use additional vanilla wafers as a decorative topping and add a small splash of vanilla extract to the filling.
– Individual banana pudding cups: Assemble the wafers, bananas, and filling in small glasses or dessert cups for parties and gatherings.
Keep in mind that substantial ingredient changes may affect the sweetness and consistency, so add optional ingredients gradually.
What to Serve with Not Yo’ Mama’s Banana Pudding
This dessert is delicious on its own, but it also pairs beautifully with a variety of meals and treats.
– Southern comfort food: Serve after fried chicken, baked ham, barbecue ribs, or a hearty casserole.
– Summer cookouts: Pair it with grilled chicken, burgers, corn on the cob, and fresh salads.
– Holiday dinners: Offer it alongside pecan pie, apple crisp, or other traditional desserts.
– Afternoon treats: Enjoy a chilled bowl with coffee, iced tea, or a glass of cold milk.
– Potluck gatherings: Bring the pudding in a large covered dish and serve it with a sturdy spoon so everyone can scoop up the creamy layers.
Storage and Make-Ahead Instructions
Refrigeration: Store leftover banana pudding in a tightly covered container in the refrigerator. For the best quality, enjoy it within two to three days, as the bananas may darken and the wafers will continue to soften.
Make ahead: You can prepare the dessert the evening before serving. Overnight chilling is ideal for developing the signature soft wafer layers.
Freezing: Freezing is not recommended because the bananas may become mushy and the creamy filling can separate or change texture after thawing.
Serving tip: Keep the pudding refrigerated until serving time, and return leftovers to the refrigerator promptly. Since it contains dairy, avoid leaving it at room temperature for more than two hours, or one hour when temperatures exceed 90°F.
Recipe Details
– Prep Time: 20 minutes
– Cooking Time: 0 minutes
– Chilling Time: At least 4 hours
– Total Time: 4 hours 20 minutes, plus additional chilling if desired
– Servings: 8
– Estimated Calories: 320 per serving, depending on ingredients and portion size
Frequently Asked Questions
Can I make Not Yo’ Mama’s Banana Pudding the day before?
Absolutely! Making it the day before is one of the best ways to prepare this dessert. Overnight refrigeration gives the filling time to set and allows the vanilla wafers to soften into delicious, cake-like layers.
Why is my banana pudding runny?
The pudding may not have thickened sufficiently, the cream cheese may not have been blended properly, or the whipped cream may have been too loose. Make sure the pudding thickens before combining the mixtures, use the specified quantities, and allow enough chilling time.
How do I keep the bananas from turning brown?
Slice the bananas shortly before assembling the dessert and cover them completely with pudding. You can also lightly toss the slices with a small amount of lemon juice, although this may slightly change the flavor.
Can I use homemade whipped cream?
Yes. Homemade whipped cream can be used if it is whipped to soft or medium peaks and folded gently into the filling. The final texture may differ slightly from a stabilized whipped topping.
Can I use a different cookie?
Vanilla wafers provide the traditional flavor and texture, but butter cookies or shortbread cookies can be used as alternatives. Keep in mind that different cookies may soften at different rates.
Final Thoughts
Not Yo’ Mama’s Banana Pudding is proof that a handful of simple ingredients can create an unforgettable dessert. With its fluffy cream cheese filling, sweet vanilla pudding, ripe bananas, and tender vanilla wafer layers, this no-bake favorite delivers comfort and indulgence in every spoonful.
It’s easy enough for a weeknight treat, impressive enough for a holiday table, and convenient enough to prepare ahead for a crowd. Once you see how quickly the layers come together and how delicious they taste after chilling, you’ll understand why this creamy banana pudding remains such a popular dessert.
Make a dish for your next family gathering, chill it until perfectly set, and watch everyone come back for another helping. One spoonful of this rich, creamy, old-fashioned favorite might be all it takes to make it a permanent addition to your dessert collection!