
Grandma Linda’s Snow-Day Chicken Pot Pie – Warm, Cozy & Everyone Fights for Seconds!
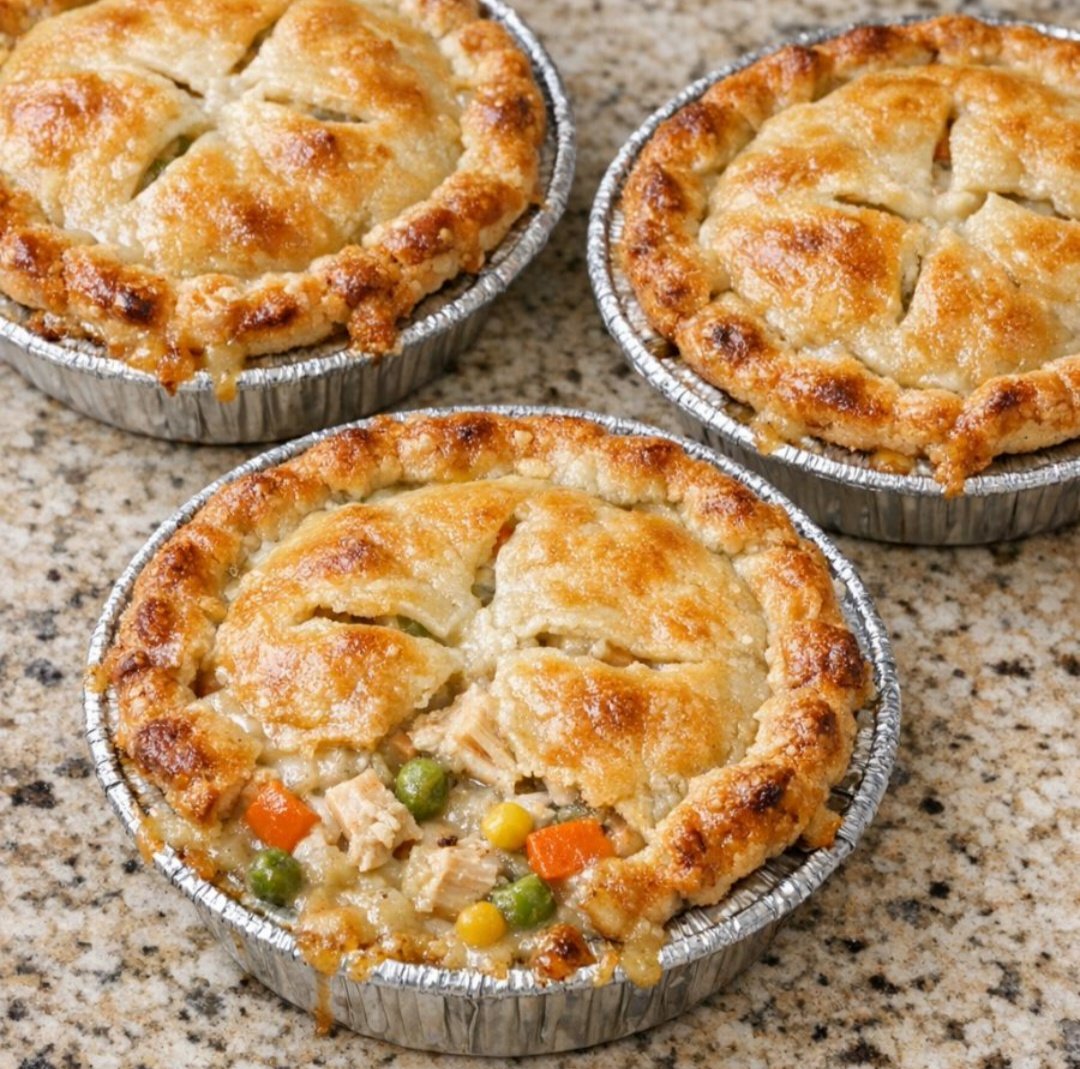
Some recipes are more than just dinner; they’re the kind of comfort food memories are made of. Grandma Linda’s Snow-Day Chicken Pot Pie is one of those timeless family favorites, filled with tender chicken, colorful vegetables, and rich, creamy gravy, all tucked beneath a flaky, golden pie crust.
Grandma Linda always called this her “snow-day dinner” because it was what she made whenever the weather turned cold and everyone needed something warm and satisfying. The smell of buttery pastry baking in the oven, the creamy filling bubbling around the edges, and that first golden slice being served straight from the tin made it a meal everyone looked forward to.
The best part? This easy homemade chicken pot pie recipe uses convenient shortcuts like rotisserie chicken and frozen mixed vegetables, giving you all the flavor of traditional comfort food without spending hours in the kitchen.
Whether you’re preparing a cozy Sunday supper, feeding hungry family members on a chilly evening, or looking for an easy weeknight casserole, these individual chicken pot pies are guaranteed to bring everyone to the table. Make three, because one is never enough!
Why You’ll Love This Chicken Pot Pie Recipe
– Easy weeknight dinner: Rotisserie chicken and frozen vegetables save valuable preparation time.
– Rich and creamy filling: Homemade gravy brings everything together with delicious, comforting flavor.
– Golden, flaky crust: A buttery pastry topping bakes beautifully until crisp and golden.
– Perfect for family dinners: Three individual foil tins make serving simple and convenient.
– Make-ahead friendly: Assemble and freeze the pies for an easy future dinner.
– Customizable: Add your favorite vegetables, herbs, or cheese to make the recipe your own.
Ingredients for Grandma Linda’s Snow-Day Chicken Pot Pie
Here’s everything you need to make three cozy individual chicken pot pies.
– 3 cups cooked rotisserie chicken, shredded or chopped: The star of the filling. Rotisserie chicken adds tender, savory bites while keeping preparation quick and easy.
– 3 cups frozen mixed vegetables, thawed: A classic combination of peas, carrots, corn, and green beans adds color, sweetness, and texture. Drain away excess moisture before mixing.
– 4 tablespoons butter: Creates the rich foundation for the homemade gravy and adds a delicious buttery flavor.
– 1/3 cup all-purpose flour: Thickens the gravy, helping it coat the chicken and vegetables without becoming watery.
– 2 cups chicken broth: Provides savory depth and brings the gravy together.
– 1 cup whole milk: Makes the filling creamy, smooth, and wonderfully comforting.
– 1/2 teaspoon salt: Enhances the natural flavors of the chicken and vegetables.
– 1/2 teaspoon black pepper: Adds gentle warmth and classic pot pie seasoning.
– 1 teaspoon dried thyme: Gives the filling a traditional savory, homemade flavor.
– 2 refrigerated pie crusts: Create the flaky golden topping that makes chicken pot pie so irresistible.
– 1 tablespoon chopped fresh parsley (optional): Adds a little freshness and color to the creamy filling.
– 1 large egg: Helps the pastry develop a beautiful golden-brown finish.
– 1 tablespoon water: Thins the egg slightly to create an easy-to-brush egg wash.
Kitchen Equipment
– Three small foil pie tins
– Medium saucepan
– Large mixing bowl
– Whisk
– Wooden spoon or spatula
– Pastry brush
– Baking sheet
– Sharp knife
Step-by-Step Instructions
Step 1: Preheat the Oven
Preheat your oven to 375°F (190°C).
Place the three foil pie tins on a baking sheet. This makes transferring the pies easier and catches any filling that bubbles over during baking.
Step 2: Prepare the Creamy Gravy
In a medium saucepan over medium heat, melt the butter.
Whisk in the flour and cook for approximately 1 minute, stirring constantly. This creates a simple roux that will thicken the gravy.
Slowly pour in the chicken broth while whisking to prevent lumps. Add the milk and continue stirring until the mixture becomes smooth and creamy.
Allow the gravy to simmer gently for 3–5 minutes, or until it thickens enough to coat the back of a spoon.
Season with salt, black pepper, and dried thyme.
Step 3: Combine the Chicken and Vegetables
In a large mixing bowl, combine the shredded rotisserie chicken and thawed mixed vegetables.
Pour the warm creamy gravy over the mixture. Add the chopped fresh parsley if using.
Stir gently until everything is evenly coated in the gravy. The filling should look creamy and generously packed with chicken and vegetables.
Step 4: Prepare the Pie Crusts
Unroll the refrigerated pie crusts onto a lightly floured surface.
Cut the crusts into three pieces or circles large enough to cover the tops of your foil pie tins. Depending on their size and shape, you may need to overlap and patch some sections.
Don’t worry about making the pastry perfectly uniform. A rustic homemade appearance is part of this recipe’s charm!
Step 5: Fill the Pie Tins
Divide the chicken and vegetable filling evenly among the three foil pie tins.
Spread the mixture gently so each pie has an even layer of filling. Leave a little room near the top to prevent excessive bubbling.
Step 6: Add the Golden Pastry Topping
Carefully place the prepared pie crust pieces over each filled tin.
Overlap the pastry as needed to cover the filling completely. Press the edges gently against the rims of the foil tins to seal.
Use a small sharp knife to cut 3–4 slits into the top of each crust. These openings allow steam to escape and help prevent a soggy pastry topping.
Step 7: Brush with Egg Wash
In a small bowl, whisk together the egg and tablespoon of water.
Using a pastry brush, lightly coat the tops of the crusts with the egg wash.
This simple step gives the pastry that beautiful glossy, golden-brown appearance that makes homemade chicken pot pie so inviting.
Step 8: Bake Until Golden and Bubbling
Place the baking sheet with the prepared pies into the preheated oven.
Bake for 25–30 minutes, or until the pastry is deeply golden brown and the creamy filling is bubbling around the edges.
If the tops begin browning too quickly, loosely cover them with aluminum foil for the remaining baking time.
Step 9: Rest and Serve
Remove the pies from the oven and allow them to rest for 10–15 minutes before serving.
This resting time helps the creamy filling settle and thicken slightly, making each serving easier to scoop.
Serve warm directly from the foil tins and enjoy the cozy, homemade goodness!
Grandma Linda’s Best Tips for Perfect Chicken Pot Pie
1. Use rotisserie chicken for convenience.
Rotisserie chicken is a wonderful shortcut because it is already cooked, tender, and flavorful. Remove the skin and bones before shredding.
2. Don’t skip the roux.
Cooking the flour briefly in melted butter before adding the liquids helps create a smooth, thick gravy without a raw flour taste.
3. Drain your vegetables well.
Excess water from thawed frozen vegetables can make the filling too thin. Pat them dry if necessary.
4. Keep the pastry cold.
Cold pie crust is easier to handle and generally produces a flakier topping. If the pastry becomes too soft while assembling, refrigerate it briefly.
5. Always cut steam vents.
Those little openings allow moisture to escape, helping the pastry bake properly instead of becoming soggy.
6. Let the pies rest before serving.
The filling will be extremely hot straight from the oven. A short resting period also helps it hold together better.
Easy Variations to Try
Condensed Soup Shortcut: Replace the homemade gravy with two cans of condensed cream of chicken soup mixed with approximately 1 cup of milk or chicken broth. Season with extra pepper and herbs.
Double-Crust Chicken Pot Pie: For an even heartier version, line the bottom of each pie tin with additional refrigerated pastry before adding the filling. Cover with the top crust and allow extra baking time as needed to cook the bottom pastry.
Cheesy Chicken Pot Pie: Stir in 1/2 to 1 cup of shredded cheddar or Swiss cheese for an extra-rich, cheesy filling.
Extra Vegetable Version: Add frozen broccoli, corn, green beans, or additional carrots. Keep the total vegetable quantity around 3 cups for the best filling consistency.
Herb-Loaded Version: Add fresh rosemary, parsley, or a little extra thyme for a more aromatic homemade flavor.
Lighter Chicken Pot Pie: Use 1% milk and reduce the butter to 2 tablespoons. The filling will be a little less rich but still delicious.
What to Serve with Chicken Pot Pie
Because these individual chicken pot pies are already hearty and satisfying, simple side dishes work beautifully.
– Steamed green beans: A fresh vegetable side that balances the creamy filling.
– Garden salad: Mixed greens, cucumber, tomatoes, and tangy vinaigrette add freshness.
– Warm dinner rolls: Perfect for soaking up every last bit of delicious gravy.
– Roasted broccoli: Adds a slightly crisp texture and complements the savory chicken.
– Cranberry sauce: A little sweetness and tanginess make a lovely contrast.
– Buttermilk biscuits: Another comforting option for a cozy family meal.
For drinks, serve hot apple cider, herbal tea, or hot chocolate to complete the perfect snow-day dinner.
Make-Ahead, Storage, and Freezing Instructions
Make Ahead: Assemble the pies, cover them tightly, and refrigerate for up to 24 hours before baking. For the best pastry texture, brush with egg wash just before baking.
Refrigerator Storage: Allow leftover pies to cool, then cover and refrigerate for up to 3 days.
Freezing: Assemble the pies without baking, wrap them tightly in freezer-safe foil, and freeze for up to 2 months.
Reheating: Reheat refrigerated leftovers in a 350°F oven until heated through. Cover loosely with foil if the crust begins browning too much.
Baking from Frozen: Bake at 375°F, loosely covered with foil initially, then uncover and continue baking until the pastry is golden and the center is thoroughly hot. Allow additional baking time compared with refrigerated pies.
Frequently Asked Questions
Can I use leftover cooked chicken instead of rotisserie chicken?
Absolutely! Any cooked, shredded, or diced chicken works beautifully. Leftover roasted chicken or poached chicken breast are both excellent choices.
Can I use fresh vegetables instead of frozen?
Yes. Simply cook harder vegetables such as carrots and green beans until slightly tender before combining them with the chicken and gravy.
How do I prevent a watery chicken pot pie filling?
Make sure the gravy is sufficiently thick before mixing it with the chicken and vegetables. Also, drain thawed vegetables thoroughly and avoid adding excess liquid.
Can I make one large chicken pot pie instead?
Yes! Transfer the filling to a standard pie dish, cover with pastry, cut steam vents, and bake at 375°F until the crust is golden and the filling is bubbling. A larger pie may require additional baking time.
Why does my chicken pot pie crust turn soggy?
Too much moisture in the filling, insufficient steam vents, or underbaking can contribute to soggy pastry. A properly thickened filling and fully baked golden crust help prevent this.
Final Thoughts: A Cozy Family Dinner Worth Making Again and Again
Grandma Linda’s Snow-Day Chicken Pot Pie is everything a comforting homemade dinner should be: creamy, hearty, flaky, and wonderfully satisfying.
With tender rotisserie chicken, colorful vegetables, rich homemade gravy, and a beautiful golden pastry topping, this easy chicken pot pie recipe brings traditional family comfort to the table without requiring hours of preparation.
It’s perfect for cold evenings, busy weeknights, Sunday dinners, and those special moments when everyone gathers around the kitchen waiting for something delicious.
Make a batch, save a couple for later, and don’t be surprised when everyone comes back asking for seconds. After all, Grandma Linda knew exactly what she was doing!
One bite, and you’ll understand why this snow-day dinner deserves a permanent place in your family recipe collection.