This recipe is especially appealing for anyone following a keto or low-carb lifestyle because it uses simple, sugar-free ingredients to recreate a nostalgic favorite. It is satisfying, dessert-worthy, and surprisingly easy to make at home. If you grew up loving the light, airy, chocolate-coated candy bars, this homemade version will bring back those memories without the sugar rush.
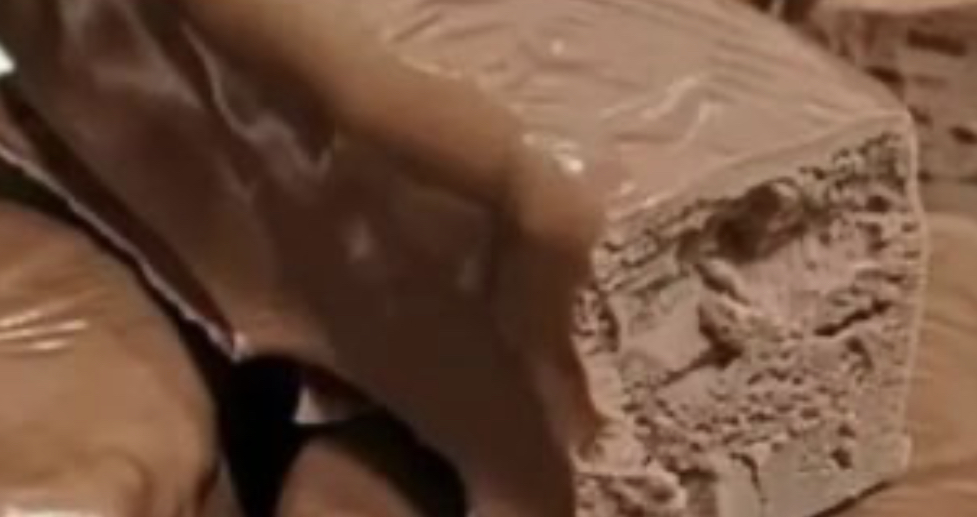
What makes this recipe truly special is how closely it mimics the texture of the original. The whipped filling creates that signature airy bite, while the sugar-free chocolate coating provides the perfect crisp shell. It is a dessert that feels indulgent but fits perfectly into a low-carb lifestyle.
Why This Recipe Is Special
-
Keto-Friendly and Sugar-Free: No added sugar, low in net carbs, and made with ingredients that align with ketogenic macros.
-
Light, Fluffy Texture: The whipped filling creates an airy, mousse-like center that feels just like the real thing.
-
No Baking Required: Simple no-bake preparation makes this recipe beginner-friendly.
-
Freezer-Friendly: Make a batch ahead and enjoy anytime cravings hit.
-
Simple Ingredients: Uses accessible, low-carb ingredients you can find at most grocery stores.
-
Customizable Sweetness: Adjust the sweetener to your personal preference easily.
Is This Recipe Keto-Friendly?
Yes, this recipe is keto-friendly because it uses sugar-free sweeteners, unsweetened cocoa powder, and low-carb chocolate instead of traditional sugar. The ingredients keep net carbs low while providing fat and moderate protein, which aligns with keto macros. Each serving typically contains only a few net carbs, depending on the sweetener and chocolate used, making it suitable for most ketogenic meal plans.
Can This Fit Into a Weight Loss Plan?
This recipe can fit into a weight-loss plan when eaten in moderation. It is low in net carbs and higher in fats, which can help with satiety on a keto diet. The absence of added sugar also helps reduce blood sugar spikes compared to traditional candy. However, portion control still matters since it is calorie-dense like most desserts.
My Personal Experience
I was surprised by how close the texture is to the original candy bar. The whipped filling creates that signature airy bite that makes this recipe feel nostalgic. Freezing before coating made everything much easier to handle—it helps the bars keep their shape and makes the chocolate coating smoother. I found the flavor improves after a few hours in the fridge; the chocolate sets beautifully and the filling becomes perfectly creamy. These became my go-to keto dessert for cravings. They satisfy a sweet tooth quickly without feeling overly heavy.
Perfect For
This recipe is ideal for:
-
Keto dessert lovers looking for a nostalgic treat
-
Meal prep treats to keep on hand for cravings
-
Holiday platters and dessert tables
-
Quick weeknight indulgences when you need something sweet
-
Anyone transitioning to a low-carb lifestyle who still wants familiar comfort foods
Since it stores well, it is perfect for keeping a stash in the fridge or freezer.
Why You Will Love This Recipe
-
Rich chocolate flavor without sugar— indulge while staying keto-friendly
-
Easy no-bake preparation — no oven needed, keeping things simple and stress-free
-
Freezer-friendly convenience — make a batch ahead and enjoy anytime
-
Light mousse-like center — the fluffy texture feels special compared to dense desserts
-
Customizable sweetness — adjust the sweetener to your personal preference
Keto Musketeer Candy
Prep Time: 20 minutes | Chill Time: 2 to 3 hours | Total Time: 2½ to 3½ hours
Yield: 8 to 12 bars
These homemade keto candy bars feature a light, airy chocolate mousse filling coated in a crisp sugar-free chocolate shell. They are the perfect low-carb alternative to the classic candy bar.
Ingredients
For the Filling:
-
1 cup heavy cream (full-fat for the richest texture)
-
4 ounces cream cheese, softened
-
¼ cup unsweetened cocoa powder (Dutch-processed recommended)
-
½ cup powdered keto sweetener (erythritol blend or monk fruit)
-
1 teaspoon vanilla extract
For the Chocolate Coating:
-
1 cup sugar-free chocolate chips
-
1 tablespoon butter or coconut oil
Instructions
Step 1: Whip the Cream
In a large mixing bowl, whip the heavy cream using a hand mixer or stand mixer until stiff peaks form. Set aside.
Step 2: Prepare the Mousse Base
In a separate bowl, beat the softened cream cheese until smooth and creamy. Add the powdered keto sweetener, unsweetened cocoa powder, and vanilla extract. Beat until well combined and smooth.
Step 3: Combine
Gently fold the whipped cream into the cream cheese mixture in thirds, using a spatula to maintain the light, airy texture. Fold until no streaks remain and the mixture is uniform.
Step 4: Taste and Adjust
Taste the filling and adjust sweetness if needed. Sweeteners vary, so this step makes a big difference.
Step 5: Chill the Filling
Line an 8×8-inch baking dish with parchment paper. Spread the filling evenly into the dish, smoothing the top with a spatula. Place in the refrigerator for at least 2 to 3 hours, or until firm.
Step 6: Cut into Bars
Once the filling is firm, lift it out of the dish using the parchment paper. Place on a cutting board and cut into 8 to 12 bars (depending on your desired size). Use a sharp knife and wipe it clean between cuts for neat edges.
Step 7: Freeze the Bars
Place the cut bars on a parchment-lined baking sheet and freeze for 20 to 30 minutes. This step is crucial—it keeps them firm and makes coating much easier.
Step 8: Melt the Chocolate
In a microwave-safe bowl, combine the sugar-free chocolate chips and butter or coconut oil. Microwave in 20 to 30-second intervals, stirring well after each, until completely melted and smooth. If the chocolate feels too thick, add a tiny bit more coconut oil. It should be fluid enough to pour but not watery.
Step 9: Coat the Bars
Remove the bars from the freezer. Using a fork, dip each bar into the melted chocolate, turning to coat completely. Let excess chocolate drip off before placing on a parchment-lined baking sheet. The fork allows excess chocolate to drip off and gives you a cleaner finish.
Step 10: Set the Coating
Place the coated bars in the refrigerator for about 15 to 20 minutes, or until the chocolate is fully set. Letting them set in the fridge rather than at room temperature keeps the chocolate shiny and prevents melting.
Step 11: Serve and Store
Enjoy immediately or store for later. The flavor improves after a few hours in the fridge.
Common Mistakes to Avoid
-
Not chilling the filling long enough before cutting — this causes messy, misshapen bars
-
Overheating the chocolate — leads to thick, grainy coating; melt gently
-
Using granulated sweetener instead of powdered — creates a gritty texture; powdered blends smoothly
-
Skipping the freezing step before dipping — makes coating difficult; frozen bars hold their shape
-
Not letting the coating set in the fridge — the chocolate may soften at room temperature
Required Equipment
-
Mixing bowl — gives space for whipping the filling evenly
-
Hand mixer or stand mixer — creates the fluffy mousse texture quickly
-
Parchment paper — prevents sticking and makes cleanup easy
-
Microwave-safe bowl — ideal for melting chocolate smoothly
-
Knife — for clean, even bar shapes
-
Fork — for dipping bars and allowing excess chocolate to drip off
Caleb’s Recipe Tips
-
Chill the bars in the freezer for about 20 to 30 minutes before dipping them in chocolate. Trust me, this keeps them firm and makes coating way less messy.
-
If your melted chocolate feels too thick, add a tiny bit more coconut oil. It should be fluid enough to pour but not watery.
-
Use a fork to dip the bars instead of tongs. It lets excess chocolate drip off and gives you a cleaner finish.
-
Taste the filling before chilling and adjust sweetness if needed.Sweeteners vary a lot, so this step makes a big difference.
-
Let the coated bars set in the fridge rather than at room temperature.This keeps the chocolate shiny and prevents melting.
Storage Instructions
-
Refrigerator: Store leftovers in an airtight container in the refrigerator for up to 1 week.
-
Freezer: For longer storage, place bars in a freezer-safe container with parchment between layers and freeze for up to 2 months.
-
Thawing: Thaw in the fridge for the best texture. Keeping them chilled helps maintain the keto-friendly chocolate coating without melting.
Nutritional Information
Please note that values are estimates and will vary based on specific ingredients, sweetener brands, and portion sizes.
Per bar (based on 10 bars):
| Nutrient | Amount |
|---|---|
| Calories | 140–170 |
| Protein | 2–3g |
| Carbohydrates | 4–6g |
| Fiber | 2–3g |
| Net Carbs | 2–3g |
| Fat | 12–15g |
| Sugar | 0–1g |
Final Thoughts
Keto Musketeer Candy is proof that you do not have to give up nostalgic treats when following a low-carb lifestyle. With its light, airy mousse filling and crisp chocolate coating, this candy captures everything you love about the classic bar without the sugar.
Whether you are making them for yourself, sharing with family, or adding to a holiday dessert platter, these candies are sure to impress. They are simple to make, freezer-friendly, and satisfying in all the right ways.
I hope this recipe brings a little sweetness to your keto journey. If you give it a try, please leave a comment below. I would love to hear how it turned out for you.