
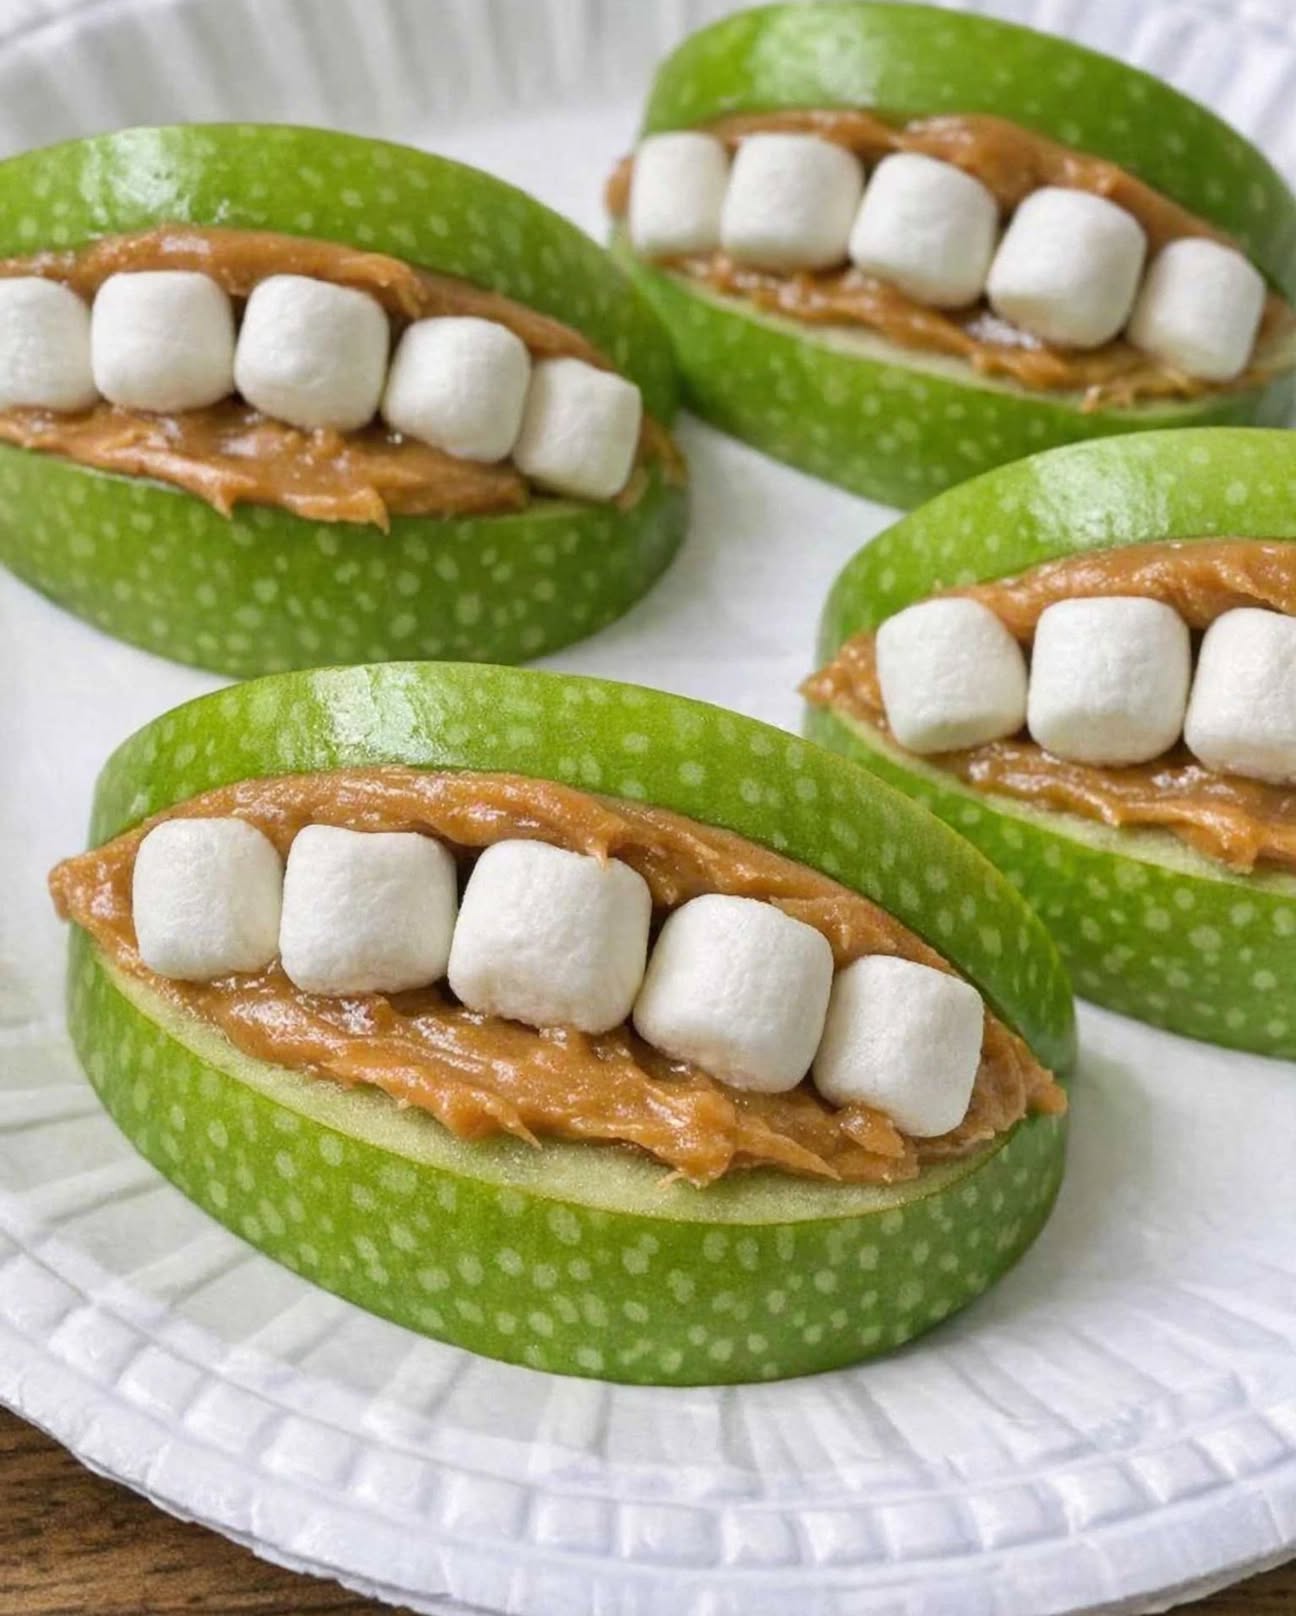
3-Ingredient Monster Mouth Apples – Easy Halloween Party Snack for Kids
Every October, these 3-Ingredient Monster Mouth Apples bring a little spooky fun to the Halloween table! My son loves making these silly apple treats for his annual Halloween party, and they never seem to last long enough to make it through the evening. With crisp green apples, creamy peanut butter, and fluffy mini marshmallows, you can create adorable monster mouths that are just as fun to make as they are to eat.
The best part? This easy Halloween snack requires only 3 ingredients, no baking, and almost no cleanup. Simply slice the apples, spread on the peanut butter, add marshmallow teeth, and sandwich everything together to create a goofy little monster grin. The bright green apples make the perfect spooky base, while the peanut butter holds the sweet marshmallow teeth in place.
Whether you’re preparing a classroom Halloween party, a fall festival treat table, a neighborhood get-together, or a festive after-school snack, these no-bake monster apples are an easy way to make ordinary fruit feel special. They’re simple enough for little helpers to assemble and customizable enough to keep older kids entertained, too.
If you’re looking for a quick Halloween recipe that looks adorable on a platter without requiring hours in the kitchen, these monster mouths deserve a place on your October menu!
Why You’ll Love These 3-Ingredient Monster Mouth Apples
– Only 3 simple ingredients: You need green apples, peanut butter, and mini marshmallows to create this fun Halloween treat.
– No oven required: There’s no baking, melting, or complicated preparation involved.
– Ready in minutes: These spooky apple snacks are perfect when you’re short on time but still want something festive.
– Kid-friendly fun: Children can help spread the peanut butter and arrange the marshmallow teeth with adult supervision during cutting.
– A playful fruit snack: Crisp apples provide a refreshing contrast to the creamy filling and sweet marshmallows.
– Perfect for Halloween parties: Their silly smiles make them a natural fit for school celebrations, fall gatherings, and October movie nights.
– Easy to customize: Add candy eyes, use different apple varieties, or substitute sunflower seed butter for a nut-free alternative.
Ingredients for 3-Ingredient Monster Mouth Apples
You only need three everyday ingredients to make these adorable Halloween snacks.
1. Green Apples – 3 Medium Apples
Green apples provide the crisp, sturdy foundation for each monster mouth. Their slightly tart flavor balances the sweetness of the marshmallows, while their bright green skin gives the finished snacks a fun, monster-inspired appearance.
Best choice: Granny Smith apples work especially well because they are firm, crisp, and pleasantly tart. Choose apples without bruises or soft spots, and wash and dry them thoroughly before cutting.
2. Peanut Butter – 1/2 Cup
Peanut butter acts as the creamy filling and edible glue that holds the marshmallow teeth between the apple slices. Its rich, nutty flavor complements the fresh apples and keeps each little monster mouth together.
Best choice: Creamy peanut butter is easiest to spread and creates a smooth, even layer. If your peanut butter is particularly thick, stir it well before using. For a school party or nut-free gathering, substitute sunflower seed butter after checking the ingredient labels for other allergens.
3. Mini Marshmallows – 1 Cup
Mini marshmallows become the silly little teeth that make these apples look like grinning Halloween monsters. Their small size makes them ideal for arranging along the edge of each apple wedge, and their soft, sweet texture contrasts nicely with the crunchy fruit.
Best choice: Use fresh mini marshmallows that are soft and easy to press into the peanut butter. Arrange them in a single row for a neat smile or vary their spacing for a funny, crooked-tooth look.
How to Make 3-Ingredient Monster Mouth Apples
These easy no-bake Halloween monster apples come together in just a few simple steps.
Step 1: Prepare the Apples
Wash and dry the green apples thoroughly. Core each apple and cut it into wedges that are thick enough to hold their shape but comfortable to bite.
For a classic monster-mouth appearance, aim for similarly sized wedges so the finished snacks look consistent on your serving platter.
If you’re preparing the apples a little ahead of time, lightly brush the cut surfaces with lemon water to help slow browning. Pat them dry before adding the peanut butter.
Step 2: Spread on the Peanut Butter
Take two apple wedges that are similar in size. Spread a thin layer of peanut butter over one cut side of each wedge.
Avoid using too much peanut butter, as a thick layer can squeeze out when you press the two apple pieces together. A thin, even coating provides enough filling to hold the marshmallows in place.
Step 3: Add the Marshmallow Teeth
Arrange several mini marshmallows along the peanut-butter-covered edge of one apple wedge. These will form the monster’s teeth.
Press them gently into the peanut butter so they stay in place. Leave a little space between the marshmallows if you prefer a goofy, uneven grin, or line them up closely for a fuller set of teeth.
Step 4: Create the Monster Mouth
Place the second apple wedge against the marshmallow-covered wedge, with the peanut-butter-covered side facing inward.
Gently press the two wedges together until the marshmallows resemble teeth peeking out from the monster’s mouth. Avoid squeezing too firmly, since the apple slices can slide and the filling may spill out.
Repeat with the remaining apple wedges, peanut butter, and marshmallows.
Step 5: Arrange and Serve
Arrange the finished monster mouth apples on a serving platter with the marshmallow teeth facing outward. For extra Halloween flair, place them alongside small pumpkins, colorful napkins, or other spooky snacks.
Serve immediately for the crispiest apples and the freshest appearance.
If you’re preparing them for a party, assemble them as close to serving time as practical. The apples taste best when freshly cut, and the peanut butter and marshmallows look neatest before the fruit releases moisture.
Pro Tips for Perfect Monster Mouth Apples
A few simple tricks will help your Halloween apple snacks look adorable and stay fresh.
Choose firm apples. Firm Granny Smith apples hold their shape better than softer varieties, making them easier to assemble and serve.
Dry the apple wedges completely. Excess moisture can make the peanut butter slide around. After washing and cutting, pat the wedges dry with a clean paper towel.
Keep the filling thin. A modest layer of peanut butter helps secure the marshmallows without making the monster mouths messy.
Prevent browning. Brush exposed apple surfaces with a little lemon water if you’re not assembling the snacks immediately. Too much lemon juice can affect the flavor, so use a light coating.
Make them look extra silly. Arrange the marshmallows unevenly to create crooked teeth. For an even more animated monster, add edible candy eyes near the top of the mouth.
Make them party-friendly. Prepare the apples and measure the other ingredients in advance, then assemble the monster mouths shortly before guests arrive.
Keep food allergies in mind. Peanut butter is a common allergen. For gatherings where nut allergies are a concern, use an appropriate alternative such as sunflower seed butter and check all packaging for allergen information and cross-contact warnings.
Use age-appropriate portions. Cut the apples into manageable pieces and supervise young children while preparing and eating them. Mini marshmallows can pose a choking risk for young children, so adapt the recipe to suit the age and abilities of your guests.
Fun Variations to Try
Once you’ve mastered the basic recipe, it’s easy to give these little monsters their own personalities.
Nut-Free Monster Mouths
Replace the peanut butter with sunflower seed butter for a nut-free variation. Check the product label and your event’s allergy requirements before serving.
Googly-Eyed Monsters
Add edible candy eyes above the mouth to create silly faces. You can make every monster different, giving some two eyes, others one, and a few funny expressions.
Red-Lipped Monster Mouths
For a more dramatic Halloween look, place a very thin strip of strawberry along the edge of the mouth to resemble a tongue. This is an optional addition rather than part of the original three-ingredient recipe.
Sweet-and-Tart Apple Monsters
Try different firm apple varieties for a slightly sweeter flavor. Green apples provide the classic tart contrast, while firm red apples create a colorful alternative.
Silly Crooked-Tooth Monsters
Instead of lining up the marshmallows evenly, alternate their spacing to create funny little grins. This is a particularly fun variation when children are helping assemble the snacks.
What to Serve with Monster Mouth Apples
These Halloween apple snacks look wonderful on a party table alongside other easy finger foods. Combine them with a mixture of sweet, savory, and fresh options for a festive spread.
– Clementine pumpkins: Peel clementines and insert a small piece of celery into the center to create a pumpkin-inspired snack.
– Pretzel sticks: Add crunchy pretzels for a salty contrast to the sweet marshmallows.
– Popcorn: Serve a bowl of lightly salted popcorn for an easy party snack.
– Cheese cubes: Offer mild cheddar or other favorite cheeses for a savory option.
– Grapes and berries: Add a bowl of washed fruit to bring more color and freshness to the table.
– Caramel dip: Serve a small bowl alongside extra apple wedges for guests who enjoy a classic fall flavor combination.
– Apple cider: Pair the platter with apple cider for a seasonal fall gathering.
– Chocolate milk: Offer a kid-friendly drink that complements the sweet, playful snack.
For a larger Halloween party, arrange everything on a big platter with the monster mouths in the center. Surround them with smaller bowls of fruit, pretzels, and cheese to create a colorful snack station that guests can enjoy throughout the celebration.
Make-Ahead and Storage Tips
Can you make monster mouth apples ahead of time?
You can wash the apples and prepare your other ingredients ahead of time, but the finished monster mouths are best assembled shortly before serving. Freshly cut apples retain their crisp texture and attractive color.
How do you keep apple slices from turning brown?
Lightly brush the cut surfaces with lemon water, then pat them dry before spreading on the peanut butter. This helps slow oxidation, although it won’t prevent browning indefinitely.
How should leftovers be stored?
Place leftover monster mouths in an airtight container and refrigerate promptly. For the best texture and appearance, enjoy them the same day. Discard any that have been left at room temperature beyond safe food-handling limits, particularly at a busy party where serving times may be uncertain.
Can you freeze monster mouth apples?
Freezing is not recommended. Apples become softer after thawing, and the peanut butter and marshmallows may lose their original texture.
Frequently Asked Questions
How many servings does this recipe make?
Three medium apples generally provide enough wedges for approximately 6 to 12 monster mouths, depending on how thickly you cut the apples and how many wedges you use per mouth. The final yield will vary with the size of your apples.
Are monster mouth apples healthy?
These snacks include fresh apples, but they also contain peanut butter and marshmallows. They can be a fun addition to a varied snack table, although the overall nutritional value depends on portion sizes and the specific ingredients you use.
Can I use red apples instead of green apples?
Absolutely! Firm red apples work well if you prefer a sweeter flavor. Green apples are especially popular because their tartness balances the sweet filling and their color suits the Halloween theme.
Can children help make this recipe?
Yes! Children can help spread the peanut butter, arrange the marshmallow teeth, and assemble the monster mouths. An adult should handle the knife and supervise age-appropriate preparation and eating.
Can I use marshmallows instead of mini marshmallows?
Mini marshmallows are the easiest option because they fit neatly along the apple wedges. Larger marshmallows can be cut into smaller pieces by an adult, but the result may be less tidy.
Is this recipe suitable for a school Halloween party?
It can be, provided the school’s food and allergy policies allow the ingredients. Because peanut butter is a common allergen, sunflower seed butter may be a better option where appropriate. Always check with the school before bringing homemade food.
Final Thoughts
These 3-Ingredient Monster Mouth Apples prove that Halloween treats don’t have to be complicated to be memorable. With crisp green apples, creamy peanut butter, and fluffy mini marshmallows, you can create a platter of silly, spooky smiles in just minutes.
They’re easy to prepare, require no baking, and bring a playful touch to school parties, fall festivals, family gatherings, and cozy Halloween movie nights. Best of all, kids can help assemble them, turning a simple snack into a fun seasonal activity.
So grab a few apples, open a jar of peanut butter, and get those marshmallow teeth ready. This October, make a batch of easy Halloween monster apples and watch these adorable little grins bring plenty of smiles to your party table!