Cheesy Burger Bombs: The Ultimate Stuffed Biscuit Burger Recipe
If you’re searching for the perfect combination of juicy beef, melted cheese, and golden-baked comfort food, these Cheesy Burger Bombs are guaranteed to become a family favorite. Imagine seasoned ground beef and gooey cheddar cheese wrapped inside soft biscuit dough, then baked until beautifully golden and irresistible. Every bite delivers all the flavors of a classic cheeseburger in a convenient, handheld package.
Whether you’re planning a quick weeknight dinner, a game-day snack, or a crowd-pleasing party appetizer, these burger bombs offer maximum flavor with minimal effort. Best of all, they require only a handful of ingredients and are ready in under 30 minutes.
Why You’ll Love These Cheesy Burger Bombs
Quick and easy to prepare
Kid-friendly and family-approved
Perfect for parties, gatherings, and meal prep
Loaded with juicy beef and melted cheese
Made with simple, affordable ingredients
Portable and mess-free compared to traditional burgers
Ingredients
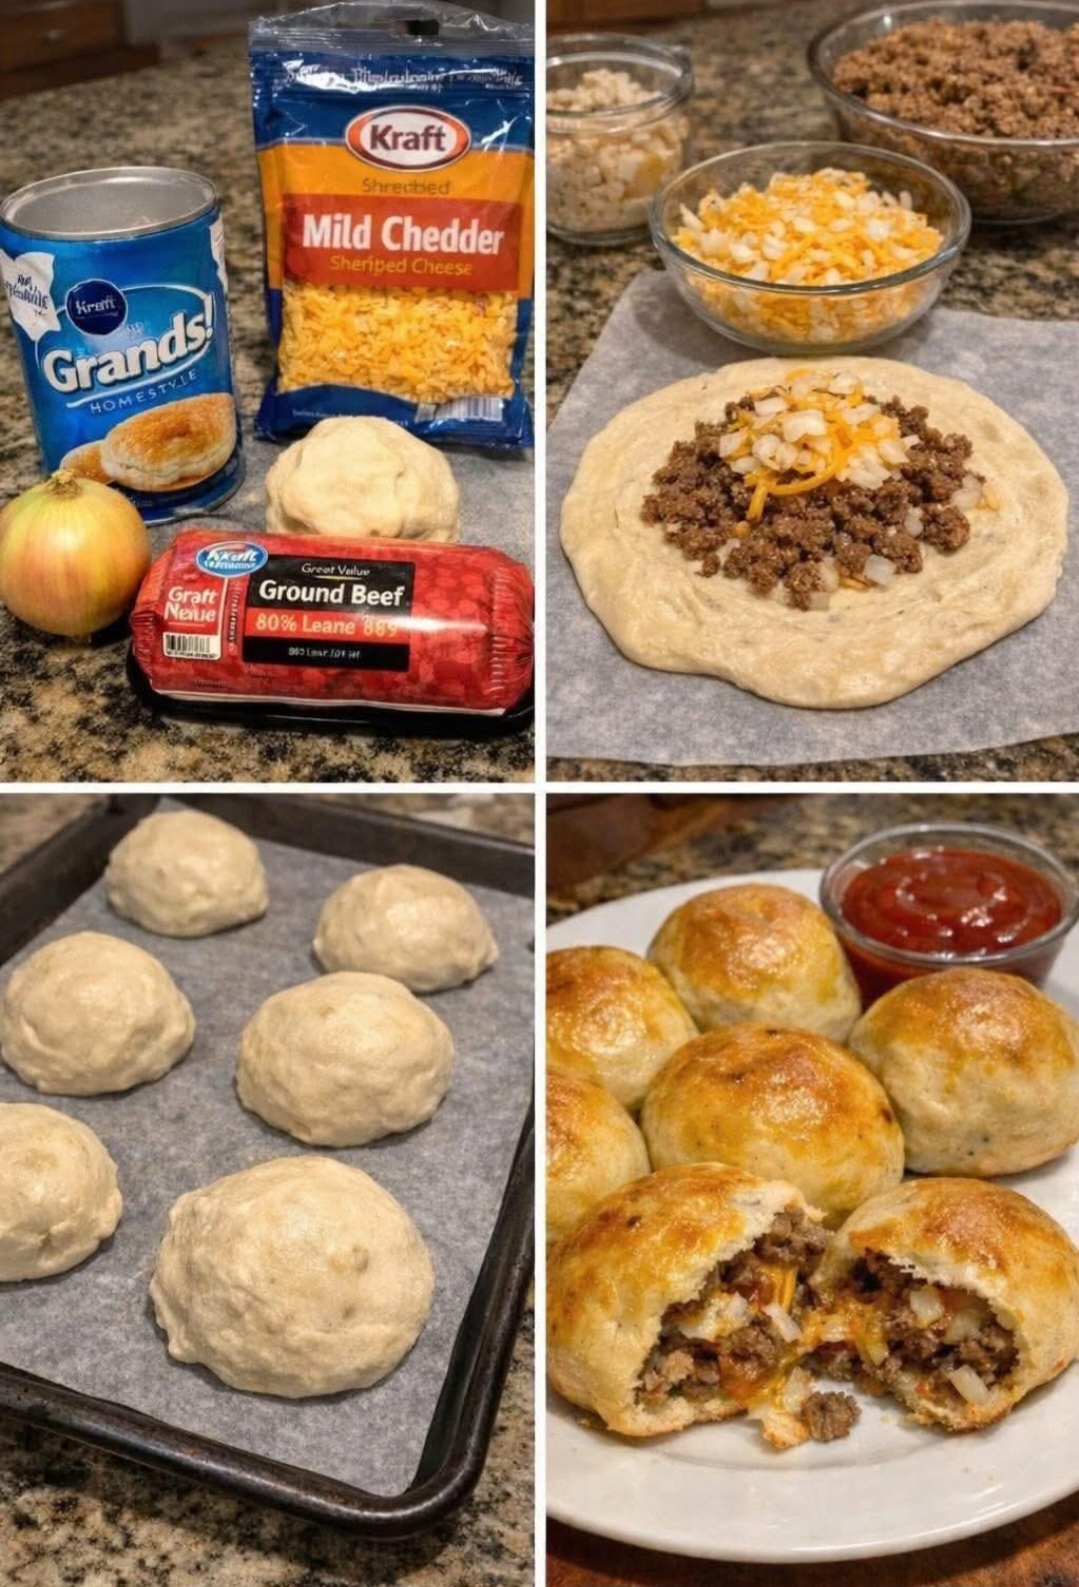
1 lb (450g) Ground Beef
The heart of the recipe. Ground beef provides the rich, savory flavor that makes these burger bombs taste just like a classic cheeseburger. Using an 80/20 blend creates the perfect balance of flavor and juiciness.
1 Cup Shredded Cheddar Cheese
Cheddar melts beautifully and adds a creamy, tangy richness. It creates that irresistible cheese pull that makes every bite memorable.
1 Can Refrigerated Biscuit Dough
The biscuit dough forms a fluffy, golden exterior that perfectly encloses the filling. It simplifies preparation while delivering bakery-quality results.
Salt and Black Pepper
Essential seasonings that enhance the natural flavor of the beef and create a balanced taste.
Optional Garlic Powder
Adds a subtle savory depth that complements both the beef and cheese.
Optional Onion Powder
Provides a mild sweetness and classic burger flavor without requiring fresh onions.
How to Make Cheesy Burger Bombs
Step 1: Preheat the Oven
Preheat your oven to 375°F (190°C). Line a baking sheet with parchment paper or lightly grease it to prevent sticking.
Step 2: Brown the Ground Beef
Place a skillet over medium heat and add the ground beef.
Cook for 6–8 minutes, breaking it apart with a spatula as it browns.
Season with:
Salt
Black pepper
Garlic powder (optional)
Onion powder (optional)
Once fully cooked, drain any excess grease and allow the beef mixture to cool slightly.
Step 3: Prepare the Biscuit Dough
Open the refrigerated biscuit dough and separate each biscuit.
Using your hands or a rolling pin, flatten each biscuit into a circle approximately 4–5 inches wide. This creates enough surface area to hold the filling while sealing properly.
Step 4: Fill the Dough
Place a spoonful of cooked beef in the center of each flattened biscuit.
Top with a generous pinch of shredded cheddar cheese.
Avoid overfilling, as this can make sealing difficult and cause leaks during baking.
Step 5: Seal into Burger Bombs
Carefully pull the edges of the dough up and around the filling.
Pinch all seams tightly together until completely sealed.
Roll gently between your palms to form a smooth ball.
Place each burger bomb seam-side down on the prepared baking sheet.
Step 6: Bake Until Golden
Transfer the baking sheet to the preheated oven.
Bake for 12–15 minutes, or until the tops are beautifully golden brown and the dough is fully cooked.
The cheese inside will become perfectly melted and deliciously gooey.
Step 7: Cool and Serve
Allow the burger bombs to cool for 3–5 minutes before serving.
This helps the filling settle and prevents the molten cheese from escaping immediately when bitten into.
Serve warm with your favorite dipping sauces.
Why This Recipe Is So Popular
These Cheesy Burger Bombs combine everything people love about cheeseburgers into one easy-to-eat package.
The contrast between the crispy golden exterior, juicy seasoned beef, and melted cheddar center creates an incredible texture and flavor experience. Because they are baked rather than fried, they offer a lighter preparation while still delivering indulgent comfort-food satisfaction.
They’re also incredibly versatile, making them ideal for family dinners, potlucks, tailgating events, and party platters.
Pro Tips for Perfect Burger Bombs
1. Let the Beef Cool Slightly
Hot beef can soften the dough and make sealing more difficult.
2. Seal Thoroughly
Carefully pinch the seams closed to prevent cheese from leaking during baking.
3. Use Freshly Shredded Cheese
Freshly shredded cheese melts more smoothly than pre-packaged varieties.
4. Add Extra Burger Toppings
Try adding:
Diced pickles
Finely chopped onions
Cooked bacon bits
Jalapeños
Mushrooms
5. Brush with Garlic Butter
For restaurant-quality flavor, brush the tops with melted butter mixed with garlic powder before baking.
6. Experiment with Cheese Varieties
Try:
Mozzarella for extra stretch
Pepper Jack for heat
Colby Jack for creamy richness
American cheese for classic burger flavor
Serving Suggestions
Turn these burger bombs into a complete meal with:
Crispy French fries
Sweet potato fries
Onion rings
Coleslaw
Garden salad
Macaroni and cheese
Potato wedges
For dipping sauces, serve with:
Ketchup
Burger sauce
Ranch dressing
Honey mustard
Barbecue sauce
Spicy mayo
Storage and Reheating
Refrigerator
Store leftovers in an airtight container for up to 3 days.
Freezer
Freeze baked burger bombs for up to 2 months.
Reheating
Warm in a 350°F (175°C) oven for 8–10 minutes or until heated through. This helps maintain their crispy exterior.
Final Thoughts
These Cheesy Burger Bombs are the perfect solution when you’re craving the bold flavors of a cheeseburger in a fun, convenient form. With simple ingredients, easy preparation, and a wonderfully cheesy center, they’re guaranteed to impress family and friends alike. Whether served as a quick dinner, party appetizer, or game-day snack, this recipe delivers big flavor with very little effort. Once you try these golden, cheesy bites, they’ll quickly earn a permanent spot in your recipe collection.