Ingredients
Four simple ingredients. Each one earns its place.
2 cups (8 oz) sharp cheddar cheese, finely shredded – The star of the show. Sharp cheddar has the bold, tangy, nutty flavor that defines cheese straws. Extra-sharp is even better. Do not use mild cheddar – the flavor will be too subtle. The “finely shredded” requirement is vital. Large shreds of cheese will not emulsify properly with the butter, creating pockets of oil that can cause the straws to lose their structural integrity and “slump” or melt into puddles in the oven. A fine shred ensures the cheese becomes part of the dough’s “scaffold.” Shred your own cheese from a block – pre-shredded cheese has anti-caking agents that can affect the texture.
½ cup (1 stick) unsalted butter, softened – The richness. Unsalted butter gives you control over the salt level (the cheese provides plenty). Softened butter blends more easily with the cheese than cold butter. Leave the butter on the counter for 30 to 60 minutes before starting. Do not microwave to soften. Do not substitute margarine – it has too much water.
1½ cups all-purpose flour – The structure. The flour absorbs the butter and cheese fats, creating the crisp, shortbread-like texture. Do not overmix – that develops gluten and makes the straws tough instead of tender. All-purpose flour works better than bread flour (too much gluten) or cake flour (not enough structure).
½ teaspoon cayenne pepper – The whisper of heat. Cayenne adds warmth and complexity without making the straws spicy. It is the secret ingredient that elevates these from good to great. Do not skip it. Do not use red pepper flakes – they are too coarse and will create hot spots. If you are sensitive to heat, use ¼ teaspoon. If you love heat, use ¾ teaspoon.
That is it. Four ingredients. No salt (the cheese provides plenty). No eggs (the butter and cheese bind the dough). No baking powder or soda (the straws rely on fat for crispness).
Directions
Follow these simple steps for cheese straws that will earn a permanent spot in your baking rotation.
Step 1 – Preheat and prepare
Preheat your oven to 350°F (175°C) .
Line two baking sheets with parchment paper. Parchment is essential – it prevents sticking and helps the straws bake evenly. Do not use wax paper or unlined baking sheets.
Step 2 – Make the lipid paste
In a medium bowl, combine the softened butter and finely shredded sharp cheddar cheese.
Blend until they form a smooth, uniform paste. Use a spatula or wooden spoon – an electric mixer is fine but not necessary.
Tip: The “finely shredded” requirement is a vital mechanical step. Large shreds of cheese will not emulsify properly with the butter, creating pockets of oil that can cause the straws to lose their structural integrity and “slump” or melt into puddles in the oven. A fine shred ensures the cheese becomes part of the dough’s “scaffold.”
Step 3 – Form the dough
Incorporate the cayenne pepper and flour into the cheese mixture.
Press and fold the dough until it is cohesive and no dry flour remains. Do not overmix. Mix just until the dough comes together.
Tip: Avoiding “dry flour pockets” is a structural necessity. If the flour is not fully hydrated by the butter and cheese fats, those areas will bake into hard, chalky spots rather than the desired flaky, crisp texture.
Step 4 – Shape the straws
You have two options for shaping:
Piping method (classic, ridged straws):
-
Fit a piping bag with a large star tip (like Wilton 1M or 2D).
-
Load the dough into the bag.
-
Pipe 4- to 5-inch long strips onto the parchment-lined baking sheets, spacing them about 1 inch apart.
Rolling method (simpler, no special equipment):
-
Lightly flour your work surface.
-
Roll the dough to ¼-inch thickness.
-
Cut into ½-inch wide strips about 4 to 5 inches long.
-
Transfer the strips to the parchment-lined baking sheets using a spatula.
Tip: Uniformity in length and width is a “thermal” necessity. Because these straws have a high fat-to-flour ratio, they can over-brown rapidly. Evenly sized strips ensure that every straw reaches its peak “snap” at the same time, preventing the ends from burning while the centers stay soft.
Step 5 – Bake one sheet at a time
Bake one sheet at a time on the center rack.
Bake for 12 to 16 minutes.
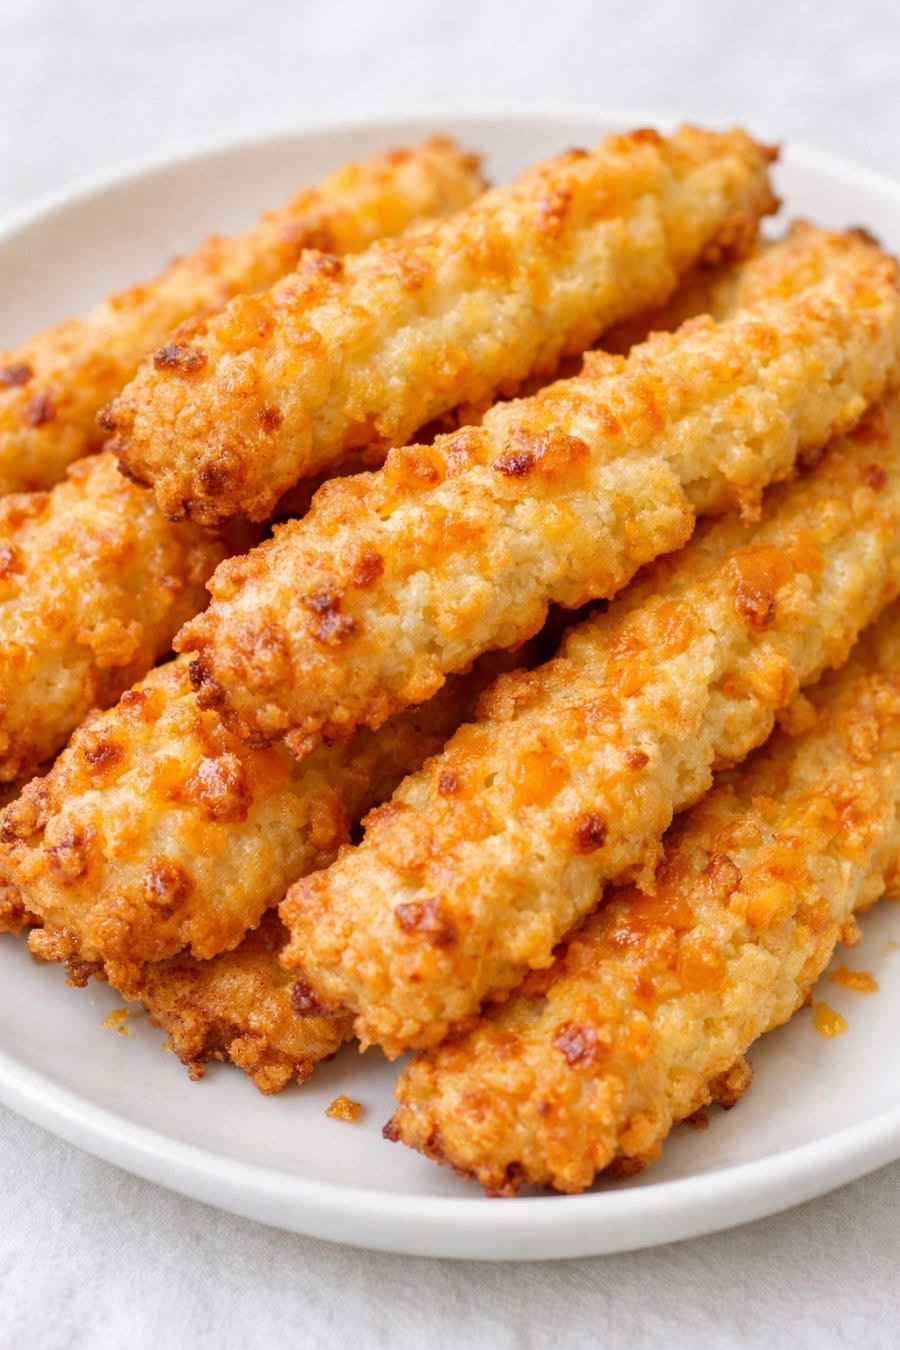
Visual cue: The straws are ready when they have transitioned to a deep, burnished gold at the edges and feel firm to a light touch.
Step 6 – The “firm-up” rest
Let the straws cool on the baking sheet for 5 minutes before transferring to a wire rack.
Tip: This rest is a “viscosity” necessity. When hot, the cheese and butter are still in a semi-liquid state. The 5-minute wait allows the fats to “re-set,” giving the straws the structural rigidity they need to be moved without snapping.
Step 7 – Cool and serve
Transfer the straws to a wire rack to cool completely. They will continue to crisp as they cool.
Serve at room temperature.
Watch them disappear. Seriously. These do not last long.
Tips for Best Results
These small details separate a good cheese straw from a great one.
Use a fine shred for the cheese – This is the most important tip. Large shreds will not emulsify properly, causing the straws to melt into puddles. Use the smallest holes on your box grater or shred in a food processor.
Shred your own cheese – Pre-shredded cheese has anti-caking agents (cellulose, potato starch) that can affect the texture. Shredding from a block takes two minutes and makes a noticeable difference.
Soften the butter properly – Softened butter should be pliable but not melted. Leave it on the counter for 30 to 60 minutes. Do not microwave. Microwaved butter can become too soft or partially melted, which changes the dough texture.
Do not overmix the dough – Overmixing develops gluten, which makes the straws tough instead of tender. Mix just until the dough comes together and no dry flour remains.
Use the visual cue, not just the timer – Ovens vary. The straws are ready when the edges are deeply golden and the straws feel firm. This usually happens between 12 and 16 minutes. Check at 12 minutes.
Do not skip the 5-minute rest on the pan – The straws are very delicate when hot. The 5-minute rest allows the fats to set, giving the straws the structural integrity to be moved without breaking.
Store properly – Cheese straws stay crisp for days if stored in an airtight container at room temperature. Do not refrigerate – the refrigerator will make them soft and stale.
Double the batch – These disappear quickly. Always make extra.
Creative Variations
Four ingredients is the starting point. Here is how to make these cheese straws your own.
Rosemary Cheddar Cheese Straws
Add 1 tablespoon of finely chopped fresh rosemary (or 1 teaspoon of dried rosemary) to the dough along with the flour. The earthy, piney rosemary pairs beautifully with the sharp cheddar.
Black Pepper Cheddar Cheese Straws
Add 1 teaspoon of coarsely ground black pepper to the dough. The pepper adds warmth and a sharp, piney bite. This is a classic variation.
Smoked Paprika Cheese Straws
Add 1 teaspoon of smoked paprika to the dough. The paprika adds smoky depth and a beautiful orange-red color. Use regular paprika if you do not have smoked.
Parmesan Black Pepper Cheese Straws
Replace ½ cup of the cheddar with ½ cup of finely grated Parmesan cheese. Add 1 teaspoon of black pepper. The Parmesan adds nutty, salty umami.
Jalapeño Cheddar Cheese Straws
Add 2 tablespoons of finely minced pickled jalapeños (blotted dry) to the dough. The jalapeños add tangy heat and little green flecks. Fresh jalapeños also work – remove the seeds for less heat.
Bacon Cheddar Cheese Straws
Add ¼ cup of finely crumbled cooked bacon to the dough. The smoky, salty bacon adds another layer of savory flavor. Blot the bacon well to remove excess grease.
Gouda and Thyme Cheese Straws
Replace the cheddar with smoked Gouda. Add 1 teaspoon of dried thyme. The smoky, nutty Gouda and earthy thyme create a completely different but equally delicious straw.
Everything Bagel Cheese Straws
After shaping the straws, brush them lightly with egg wash (or water) and sprinkle with everything bagel seasoning. The garlic, onion, sesame, poppy, and salt add savory crunch.
Serving Suggestions
These cheese straws are delicious on their own. Here is how to serve them.
With cocktails – Cheese straws and cocktails are a classic pairing. Serve them with a cold martini, a glass of wine, or a bourbon on the rocks.
With tomato soup – Use cheese straws as a crunchy dipper for a bowl of creamy tomato soup. Better than a grilled cheese. Seriously.
On a cheese board – Arrange cheese straws on a cheese board alongside soft cheeses, cured meats, olives, and nuts. They add crunch and a savory note.
At a party – Pile them in a basket lined with a napkin. Set them out on the coffee table. Watch them disappear.
As a hostess gift – Pack them in a decorative tin or a mason jar. Tie with a ribbon. Give them to your host. You will be invited back.
For Thanksgiving – Serve cheese straws alongside the turkey and stuffing. They are a Southern Thanksgiving tradition.
With salad – Crush cheese straws over a green salad instead of croutons. The cheesy, buttery crunch is an upgrade.
With beer – Cheese straws and a cold beer are a match made in heaven. Serve them at a backyard barbecue or game day gathering.
Storage and Make-Ahead Instructions
Cheese straws are perfect for making ahead.
Room temperature – Store cooled cheese straws in an airtight container at room temperature for up to 1 week. They stay crisp and delicious.
Refrigerator – Do not refrigerate. The refrigerator will make them soft and stale. Room temperature is best.
Freezer (baked) – Freeze baked cheese straws in an airtight container for up to 3 months. Thaw at room temperature. They may lose a little crispness – re-crisp in a 300°F oven for 5 minutes.
Freezer (unbaked) – Shape the straws on a parchment-lined baking sheet. Freeze until solid (about 2 hours). Transfer to a freezer bag. Bake from frozen – add 2 to 3 minutes to the bake time.
Re-crisping – If the straws lose their crunch, place them on a baking sheet and warm in a 300°F oven for 5 minutes. They will crisp right back up.
Do not refrigerate leftovers – The refrigerator will make them soft. Keep them in an airtight container in the pantry.
The Science Behind the Perfect Cheese Straw
You might wonder why these simple ingredients create such a perfect, crispy texture.
Here is the science.
The lipid paste – When you blend finely shredded cheese with softened butter, you create an emulsion. The fat from the butter and the fat from the cheese combine into a smooth, uniform paste. This is the foundation of the dough.
The flour barrier – The flour coats the fat molecules, preventing them from melting completely during baking. This creates the short, tender, crumbly texture of shortbread.
The fine shred matters – Large shreds of cheese create pockets of oil. When those pockets melt, the straws can lose their shape and “slump.” Fine shreds integrate the cheese into the dough, creating a stable structure.
No eggs, no leaveners – Eggs would add moisture and create a puffier, cakier texture. Leaveners (baking powder, baking soda) would make the straws rise. Cheese straws should be flat, crisp, and shatteringly crunchy – like a savory shortbread.
The rest on the pan – When the straws come out of the oven, the cheese and butter are still semi-liquid. Moving them immediately can cause them to snap. The 5-minute rest allows the fats to re-solidify, giving the straws the structural rigidity they need to be moved.
This is not complicated chemistry. It is just good baking.
Frequently Asked Questions
Can I use pre-shredded cheese?
You can, but the texture will suffer. Pre-shredded cheese has anti-caking agents that can affect how the cheese melts and blends with the butter. Shredding your own is strongly recommended.
Can I use a food processor to make the dough?
Yes. Pulse the butter and cheese until combined. Add the flour and cayenne. Pulse just until the dough comes together. Do not over-process.
Can I make these without a piping bag?
Yes. Use the rolling method. Roll the dough to ¼-inch thickness. Cut into strips. Transfer to the baking sheet with a spatula.
My dough is too dry and crumbly. What should I do?
Your cheese may have been too dry, or you may have used too much flour. Add 1 tablespoon of cold water and mix until the dough comes together. Do not add more than 2 tablespoons.
My dough is too sticky. What should I do?
Your butter may have been too soft, or your kitchen may be warm. Chill the dough for 30 minutes before shaping. If it is still sticky, dust your hands and work surface lightly with flour.
My straws spread into puddles. What went wrong?
Your cheese was not finely shredded enough, or your oven was not hot enough. Large shreds create pockets of oil that cause the straws to slump. Next time, use a fine shred and preheat your oven fully.
My straws are soft, not crisp. What went wrong?
You may have underbaked them. The straws should be deep golden at the edges. Return them to the oven for 2 to 3 minutes. They will crisp as they cool.
Can I use a different type of cheese?
Yes. Try sharp white cheddar, smoked Gouda, Gruyère, or a mix. Do not use soft cheeses (brie, camembert) – they have too much moisture. Do not use pre-shredded cheese blends.
Can I make these gluten-free?
Yes. Substitute the all-purpose flour with a gluten-free flour blend (like King Arthur Measure for Measure or Cup4Cup). The texture will be slightly different but still delicious.
Can I double this recipe?
Yes. The dough mixes easily in a single bowl. Bake one sheet at a time – do not crowd the oven.
Final Thoughts
Some recipes are complicated because they are trying to impress.
This recipe is simple because it knows it does not need to try.
Four ingredients. One bowl. A hot oven. That is all it takes to create a Southern classic that has stood the test of time.
The sharp cheddar provides bold, tangy flavor. The butter adds richness. The flour creates that shatteringly crisp texture. The cayenne adds a whisper of heat that makes people ask, “What is in these?”
These are not fancy crackers from a tin. These are not cheese straws from a can. These are the real thing – homemade, buttery, cheesy, and utterly addictive.
Make them for a party. Make them for a holiday. Make them for no reason at all except that you want something delicious to snack on.
Pack them in a tin and give them as gifts. Set them out with cocktails. Crush them over soup. Eat them standing at the counter while they are still warm.
However you serve them, serve them with pride. You made a Southern classic from scratch with four simple ingredients.
That is good baking.
Now go get that sharp cheddar.
Your oven is waiting.