Servings: 4–6 | Prep time: 10 minutes | Cook time: About 15 minutes | Total time: 25 minutes
Let me tell you about a cake that breaks all the rules. It doesn’t require an oven. It doesn’t require a mixer. It doesn’t require any special pans or parchment paper or complicated techniques. And yet, what comes out of that single frying pan is a warm, tender, cinnamon-spiced cake topped with soft, buttery, caramelized apple slices.
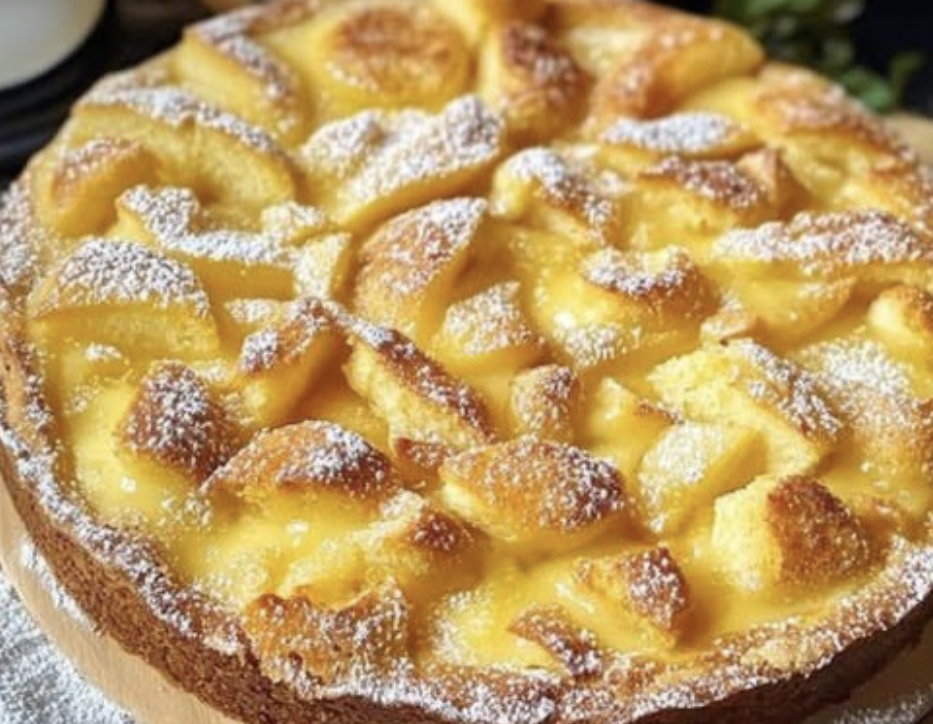
This Stovetop Apple Cinnamon Upside-Down Cake is pure magic.
The method is brilliantly simple. You sauté apple slices in butter and cinnamon right in the pan. You pour a simple, pourable batter directly over the fruit. You cover the pan with a lid and let the steam do the rest. Ten minutes later, you flip the whole thing onto a plate, and the apples — now golden, soft, and glistening — become the beautiful topping.
No oven. No baking soda or baking powder (the steam creates the rise). No complicated steps. Just one pan, a handful of ingredients, and about 25 minutes from start to finish.
This is the perfect dessert for when you want something warm, homemade, and impressive — but you don’t want to heat up the whole house, drag out the mixer, or spend all afternoon in the kitchen.
Why You’ll Love This Recipe
-
No oven required – Made entirely on the stovetop.
-
One pan – The entire recipe happens in a single frying pan.
-
Ready in 25 minutes – From first slice to flipped cake.
-
No mixer needed – The batter comes together with a whisk and a bowl.
-
No baking soda or powder – The steam from the covered pan creates the rise.
-
Beautiful presentation – The upside-down flip reveals caramelized apples on top.
-
Perfect for small kitchens, dorms, RVs, or hot summer days – Anywhere you don’t want to use an oven.
Ingredients
For the Fruit
-
Medium apples – 3, peeled and sliced into uniform wedges
-
Butter – 1 tablespoon
-
Ground cinnamon – A sprinkle (about ¼ to ½ teaspoon)
For the Batter
-
Egg – 1 large
-
Sugar – ¼ cup (granulated)
-
Flour – ¼ cup (all-purpose)
-
Milk – ¼ cup
For Serving (Optional)
-
Confectioners’ sugar – For dusting
Ingredient Notes
What kind of apples? Use firm, slightly tart apples that hold their shape during cooking. Great choices include:
-
Granny Smith – Tart and firm. The classic choice.
-
Honeycrisp – Sweet and crisp.
-
Braeburn – Balanced sweet-tart flavor.
-
Pink Lady – Sweet with a nice firm texture.
-
Jonagold – Sweet and juicy.
Avoid very soft apples like Red Delicious or McIntosh, which can turn to mush.
Why uniform wedges? Slicing the apples into uniform wedges (about ¼ to ½ inch thick) ensures they cook evenly. Thick slices won’t soften enough; thin slices may disintegrate.
Can I use other fruits? Absolutely. Try:
-
Pears – Use firm Bosc or Anjou pears.
-
Peaches or nectarines – Fresh, not canned.
-
Plums – Tart and beautiful.
-
Bananas – Slice lengthwise for a caramelized banana cake.
Why no leavening (baking soda/powder)? This cake rises from steam trapped under the lid. The egg provides structure, and the steam provides lift. It’s a clever stovetop trick that works beautifully.
Step-by-Step Directions
Step 1: Prepare the Apples
Peel the 3 medium apples. Slice them into uniform wedges (about ¼ to ½ inch thick at the widest part). Try to keep the slices roughly the same size so they cook evenly.
Step 2: Sauté the Fruit
Place a non-stick frying pan (with a lid that fits tightly) over medium heat. Add the 1 tablespoon of butter and let it melt.
Add the apple slices and a sprinkle of cinnamon (about ¼ to ½ teaspoon, depending on how much you love cinnamon). Cook over medium heat for 2 to 3 minutes, stirring occasionally, until the apples begin to soften slightly. They should not be fully cooked — just starting to soften and release their fragrance.
Remove the pan from the heat temporarily. Arrange the apple slices in an even layer across the bottom of the pan. You can create a circular pattern or just spread them evenly — this will become the “top” of your upside-down cake.
Pro tip: For a more decorative look, arrange the apple slices in a concentric circle pattern. When you flip the cake, the pattern will be visible on top.
Step 3: Make the Batter
In a medium bowl, whisk together:
-
1 large egg
-
¼ cup granulated sugar
-
¼ cup all-purpose flour
-
¼ cup milk
Whisk until smooth, with no lumps of flour remaining. The batter should be thin and pourable — similar to pancake batter or slightly thinner.
Step 4: Pour the Batter Over the Apples
Pour the prepared cake batter directly over the apples in the pan. Use a spatula or the back of a spoon to spread it evenly, making sure the batter covers all the fruit. Some apple edges may peek through — that’s fine.
Step 5: Cover and Cook
Cover the pan with a tight-fitting lid. Turn the heat down to LOW.
Cook for about 10 minutes. Do not lift the lid during this time — the trapped steam is what makes the cake rise and cook through without burning the bottom.
After 10 minutes, carefully lift the lid. The top of the cake should look set (not wet or jiggly), and the edges should be pulling away slightly from the sides of the pan. If the center is still wet, cover and cook for another 2–3 minutes.
Why a tight-fitting lid? The lid traps steam, which creates gentle, even heat on top of the cake. Without a tight seal, the steam escapes, and the cake won’t cook through properly. If your lid is loose, cover the pan with aluminum foil before putting the lid on.
Step 6: Perform the Inversion (The Big Flip!)
This is the moment of truth.
Place a large, flat plate upside-down over the top of the pan. Using oven mitts or pot holders (the pan will be hot), carefully flip the pan and plate together in one swift, confident motion.
Set the plate down on the counter. Slowly lift the pan off the cake.
What you should see: A beautiful, golden-brown cake with caramelized apple slices on top, glistening and fragrant.
If any apples stick to the pan, gently pry them loose with a spatula and place them back on the cake. It happens sometimes — no one will know.
Step 7: Serve and Garnish
While the cake is still warm, dust with confectioners’ sugar using a fine-mesh sieve or small sifter. This gives the cake a professional, bakery-style look.
Serve warm, cut into wedges like a pie. This cake is wonderful on its own, but it’s even better with a dollop of whipped cream, a scoop of vanilla ice cream, or a drizzle of caramel sauce.
Variations & Tips
Add a Caramel Layer
Before adding the apples, melt 2 tablespoons of brown sugar with the butter in the pan. Let it bubble for 30 seconds, then add the apples. This creates a sticky, caramelized bottom that becomes a glorious topping after the flip.
Add Nuts
Sprinkle 2 tablespoons of chopped pecans or walnuts over the butter before adding the apples. The nuts will toast slightly and become part of the beautiful topping.
Add a Splash of Vanilla
Add ½ teaspoon of vanilla extract to the batter. It adds warmth and depth.
Add a Pinch of Nutmeg
Add ⅛ teaspoon of ground nutmeg to the batter or to the sautéing apples. Nutmeg pairs beautifully with apple and cinnamon.
Make It Dairy-Free
-
Use vegan butter or coconut oilinstead of butter
-
Use almond milk, oat milk, or soy milk instead of cow’s milk
-
The cake will be slightly less rich but still delicious
Make It Gluten-Free
Use a gluten-free all-purpose flour blend (like King Arthur or Bob’s Red Mill) in place of the regular flour. No other adjustments needed.
Make It Vegan
-
Replace the egg with a flax egg (1 tablespoon ground flaxseed mixed with 3 tablespoons water, let sit for 5 minutes)
-
Use vegan butter and plant-based milk
-
The texture will be slightly denser but still lovely
Use a Cast Iron Skillet
A well-seasoned cast iron skillet works beautifully for this recipe. It holds heat evenly and creates an especially nice crust on the bottom (which becomes the top after flipping). The same cooking times apply.
Troubleshooting & Pro Tips
My cake stuck to the pan during the flip.
This usually happens for one of two reasons:
-
Not enough butter – Make sure you’re using a full tablespoon of butter to sauté the apples.
-
The pan wasn’t non-stick enough – A good non-stick pan is ideal. If using stainless steel or cast iron, be generous with the butter.
-
You didn’t let the cake cook long enough – The edges should pull away slightly from the pan before flipping.
If apples stick, gently pry them loose with a spatula and place them back on the cake.
The center of my cake is still wet after 10 minutes.
Every stovetop and pan is slightly different. If the center is still wet, cover and cook for another 2–3 minutes on LOW. If the edges are browning too much, reduce the heat to the lowest possible setting.
My cake didn’t rise much.
A few possibilities:
-
Your lid wasn’t tight enough, letting steam escape.
-
You lifted the lid during cooking (don’t peek!).
-
Your egg was very small (use a large egg).
-
You over-mixed the batter (mix just until combined).
Can I double this recipe?
Yes, but you’ll need a larger pan (10 or 12 inches). Double all ingredients. Cooking time may increase by 3–5 minutes. Watch for the edges pulling away from the pan.
Storage & Reheating
Room temperature: This cake is best served warm, the same day it’s made. If you must store it, keep it at room temperature for up to 4 hours.
Refrigerator: Store leftovers in an airtight container for up to 3 days. The texture will change — the cake becomes denser, but it’s still delicious.
Reheating:
-
Microwave: 20–30 seconds per slice.
-
Skillet: Warm over low heat for 1–2 minutes per side.
-
Oven: 300°F for 5–7 minutes.
Freezing: Not recommended. The texture of the apples and cake both degrade significantly upon thawing. This is best enjoyed fresh.
Frequently Asked Questions (FAQs)
Can I use canned or jarred apples?
I don’t recommend it. Canned apples are already cooked and very soft. They’ll turn to mush during the sauté and cooking process. Fresh apples are worth the extra minute of slicing.
Can I use brown sugar instead of granulated sugar in the batter?
Yes. Brown sugar will make the cake slightly moister and add a hint of molasses flavor. Use the same amount (¼ cup), but be aware that brown sugar clumps — break up any clumps before mixing.
Can I make this without cinnamon?
Absolutely. Omit the cinnamon for a plain apple cake, or try other spices like cardamom, ginger, or apple pie spice.
Why does this recipe not use baking powder or baking soda?
This is a “steam cake” or “stovetop cake.” The trapped steam creates the rise instead of chemical leaveners. It’s an old-fashioned technique used in many cuisines around the world (Japanese castella cake, certain European stovetop cakes, etc.).
Can I use a glass lid?
Yes, a glass lid is great because you can see the cake as it cooks without lifting the lid. Just be aware that condensation will form on the glass — that’s normal.
My pan doesn’t have a lid. What do I do?
Cover the pan tightly with aluminum foil, crimping the edges to create a seal. Then, if possible, place a heat-safe plate or another pan on top of the foil to weigh it down and keep the steam trapped.
What to Serve With It
Classic pairings:
-
Vanilla ice cream – The hot-cold contrast is perfection.
-
Whipped cream – Light and airy.
-
Greek yogurt – Tangy and protein-packed.
-
Caramel sauce – Drizzle over the top for extra decadence.
For breakfast or brunch:
Serve a wedge alongside scrambled eggs and bacon for a sweet-savory brunch plate. Or just eat it with a cup of coffee and call it a perfect morning.
For dessert:
Warm the cake slightly, add a scoop of ice cream, and dust with cinnamon. Serve with a cup of hot tea or coffee.
The History of Stovetop Cakes
Before modern ovens were common, home cooks around the world developed techniques for baking cakes on the stovetop. In Japan, castella cake is steamed. In parts of Europe, “pan cakes” are cooked in covered skillets. In the American South, “hoecakes” and “Johnnycakes” are cooked directly on griddles.
This recipe draws from that tradition. The covered pan traps steam, which gently cooks the top of the cake while the bottom caramelizes on the heat source. It’s an ingenious method that produces a tender, moist cake without ever turning on the oven.
Final Thoughts
This Stovetop Apple Cinnamon Upside-Down Cake is proof that you don’t need fancy equipment, a full-size oven, or complicated techniques to make a beautiful, delicious dessert. One pan. One lid. A handful of ingredients. And about 25 minutes.
The apples soften into sweet, buttery perfection. The cinnamon fills your kitchen with warmth. The cake emerges tender and golden. And that first flip — when you lift the pan and see those caramelized apples looking up at you — is genuinely magical.
Make this on a night when you want something warm and homemade but don’t want to heat up the whole house. Make it in a dorm room with only a hot plate. Make it in an RV or a tiny apartment kitchen. Make it just because it’s Tuesday and you deserve cake.